How to bulk import contacts from SQL Server into Sitecore Mongo xDB

Imagine the scenario, you have millions of customer records in an existing SQL server instance and want to tie things together with your shiny new Mongo xDB. Where to start?!?!

Hopefully the following information will help guide you towards the different areas that will need researching and developing. It’s worth noting, if you follow these steps I’d recommend the Mongo University free courses (https://university.mongodb.com/) to get acquainted with how Mongo and it’s queries work.

For this demo assume the following example infrastructure:

  • Existing on premise SQL server instance containing: user data & order records. The Sitecore deployment has no r/w access to this instance.
    • Data is structured so that a user can have: 0, 1 or more orders
  • Sitecore, SQL server and Mongo all deployed to a cloud hosted provider. Assume Mongo is used for both xDB and session

So, how do we get the data from a relational database into xDB?

There are several options here, if the Sitecore instance and the on-premise database can talk you may choose slightly different approaches – for now lets assume not.

You can get data out of sql in many ways, one simple option is to right-click the database in question and follow the ‘export data’ wizard. Here you can specify things like source databases, destination dbs or files, queries to run etc. I’ve chosen to use CSV flat files as the interim data storage. Tip, remember to check ‘Column names in the first data row’ – it will make life easier when you come to import into mongo.

One key difference between SQL and Mongo is the way you can represent linked data. The CSV will contain something like:

UserID OrderID Order total
123 456 50
123 789 150
280 535 20

Note: user 123 has made 2 orders.

Compare this to Mongo (*note, this isn’t the only option for storing data in Mongo. In this scenario the model fits well with the Sitecore approach to contact facets.):

  • User: 123
    • orders
      • ID: 456, Cost: 50
      • ID: 789, Cost: 150
  • User: 280
    • orders
      • ID: 535, Cost: 20

Lots of data? Don’t panic..!!
When dealing with big sets of data in Mongo, bulk operations are your friend – they will make things much quicker! Based on that I decided to blast the whole CSV into a temporary Mongo collection. Via a cmd prompt run:

Note, read the mongo docs for more info on mongoimport.

All well and good, but the data looks just like a sql table!
True, so we now need to process it into a format that we want for xDB.

Sitecore defines a schema for the xDB data based around Contacts, and Contact facets. Examples of this could be: for a given user, you have a facet that represents all the user’s orders. I won’t go into too much details on this – see here for some background.

The format you’d then expect to see within xDB and Mongo would be:

  • Contacts
    • Contact: _id
      • Customer (this name is up to you)
        • Orders (this name is up to you)
          • Order Id: X, Order Details: Y
          • Order Id: Z, Order Details: Q
          • etc

Ok, we need to map from rows to structured data right?
This is a pretty common problem to solve when working with databases and the solution here is the result of several attempts, each with mixed results! 🙂

The code I arrived at was pretty specific to the exact schema we have, do ask if you want a copy. I used typescript to then generate the javascript files used by the Mongo shell as it gave me type based development in a few areas.

The flow of the operations was:

  1. Bulk import the csv file into a temporary Mongo db (CRM) and then access via Mongo scripts:
  2. Batch the import of the data via queries based on information we know of the data – e.g. process each user whose email starts with a given key:
  3. Iterate through each entry in externalUsers but don’t write them into your analytics db one by one, instead store in an array and then insert batches every N users (this will be much faster!) and then reset the array. The reason for storing the createdUser dictionary is to handle users with more than 1 order:

    1. Note, the methods for the schema generation are:
  4. This should create you 4 collections: Contacts, Identifiers, Orders and EmailsTemp. The last 2 are temporary collections used later. CSUUID helper functions can be found: here.
  5. Now we should have contacts and identifiers filled out, but not associated orders.
  6. Finally we need to glue them together – this is where the temporary collections come into play:

What issues did I run into?

  • No more power! (well, memory) – if you try to store a huge array in your scripts you will quickly run out of juice and the import will grind to halt
  • You miss-map the Mongo properties so that either: the data stored is null or doesn’t match the Sitecore facet properties – here you simply get a nasty ‘can’t convert type’ mongo driver exception
  • What’s going on with the import? You can dump the output of any mongo script to a file via:  mongo runner.js > output.txt
  • Querying large sets of data can be slow – make sure you setup indexes on the collections if you need to do a lot of cross referencing e.g.: db.CRM.createIndex({“EmailAddress”:1})
  • Sitecore expects arrays of data in a slightly unusual format – beware: it’s not a standard Mongo array
  • Mongo has a 16MB size limit per document – the cap in the OrderMapping prevents the import creating giant order histories. You will want to review this in your implementation!

There is a lot of information here (sorry about that!) – mainly due to the fact it took several iterations of code to arrive at a  solution that even completed, let alone in a timely manner!

Sitecore patch include files and feature folders

I recently got caught out when trying to patch some include files within the FXM configuration. In the end the fix was simple – thanks support 🙂

For certain recent features the config is now setup with folders per feature. An example would be:
– app_config
– – include
– – – fxm
– – – – Sitecore.FXM.config
– – – – … etc
– – – Sitecore.Diagnostics.config
– – – … etc

Now say you want to patch the config within Sitecore.FXM.config, in order for the patch:before and patch:after logic to work correctly you need to create a new folder which has a start letter greater than Fxm. An example would be /app_config/include/zzz.

The reason being, Sitecore looks to process all the files in /app_config/include first, then all the folders e.g. /app_config/include/fxm etc.

In the scenario I was interested in i.e. patching the FXM pipeline:

You need to remember to include the group tag to ensure the nesting is correct. The final patched config you’d need would be:

Happy patching 🙂

Testing Sitecore Federated Experience Manager without a deploy

We are starting the migration of a site to make use of Sitecore FXM (federated experience manager) and wanted to do a very quick test as to how it would play with our existing sites javascript. The key question was are there any glaringly obvious issues when we drop in the beacon?

There are a few options – a common one would be to add the beacon to a qa / uat site and test there. However, what if the content isn’t as up-to-date – is there another solution?

The approach below is a bit hacky so don’t rely on this for your final integration testing! However, on the plus side, it’s very quick to see things in action 🙂

  1. Select the site you want to test on. Nominally: www.sitecore.net
  2. Fire up a new instance of Sitecore on your dev machine (8.1 if possible) with the host: fxm.www.sitecore.net
  3. Create a new FXM site entry and set the host to be fxm.www.sitecore.net
    1. Note, we will change this later
  4. Through the FXM experience editor add a hello world placeholder and control to your page
    1. This should create you an item in the tree under: ‘/sitecore/system/Marketing Control Panel/FXM/www sitecore net’
  5. Open up the new placeholder you added in the tree and note the selector. This can be anything you want – for the sitecore site update this to be say ‘#Form1 > div.shell’ (without the ‘s)
    1. To find the value to use, dive into chrome developer tools, right click the element you want and choose ‘copy XPath’ or ‘copy CSS path’ – I found css was easier to work with as you can target specific elements, not array entries
  6. Update the primary domain entry added in step 3 to be www.sitecore.net
  7. Publish the lot
  8. Visit www.sitecore.net in a browser and note nothing has changed
  9. In the chrome console run the following script:
    1. var script = document.createElement(‘script’); script.type = ‘text/javascript’; script.src = ‘//fxm.www.sitecore.net/bundle/beacon’; document.head.appendChild(script);
    2. If the script here fails, make sure the ‘ are proper single quotes, not funky curly ones.
  10. You should see in the network tab a new request to the beacon – the response should be json containing all the data needed for rendering your changes to the page
  11. Check the page – in theory anything set in step 4/5 should now be applied to the page

sitecore.net screenshot

A word of caution – if you are interested in how the placeholders work you can always view: Presentation details -> Final renderings. However be careful, don’t ok (ie save) once you’ve reviewed them as the format saved back into the field isn’t compatible with FXM.

Have you ever edited in the Sitecore web db by mistake? V8.1

To build on a previous post (https://blog.boro2g.co.uk/ever-edited-sitecore-web-db-mistake/) – if you want to achieve the same kind of thing in version 8.1, you need to tweak the js slightly:

Just replace the window.onload=function()… method listed in the previous post with:

Open command prompt here

Something really quick this time in the form of a couple tips picked up at the Microsoft Future Decoded conference (which was really good btw! :))

If you are in a windows explorer and want a command prompt for the current folder, either:

  • Ctrl+Shift+right click -> Open command window here
  • Or, type in the address bar: cmd .

I’m sure there are more ways but these both seemed pretty clean and simple

Sitecore data providers – a week in the field

As part of a recent POC we’ve needed to pull large amounts of data from an external set of API’s – some ‘realtime’ i.e. prices and some more static i.e. titles, descriptions, isbn numbers etc. There were vast options for how we surface the content into the site, in the end deciding on Sitecore Data Providers for the static content and ajax for the realtime data.

If you are taking on something like this I’d recommend you carefully consider whether any data needs to ever reside, or be enriched (i.e. adding media, text etc) within Sitecore. Data providers are hugely chatty when working in the master db (watch out for the IDTable!) Note – this problem somewhat goes away when its published as real items are then created in web.

I found these examples https://bitbucket.org/itz/sitecore7codesamples/src/ a good resource to get started. 

Things that caught me out:

Quantities of items: Sitecore recommend not exceeding 100 (ish) items per folder –  a basic implementation could pull all external items into one folder however you don’t really want to limit yourself to < 100 items. A few options are: build a structure, use buckets, use a hybrid. Before trying buckets I’d recommend building some basic structure to get to grips with public override IDList GetChildIDs

Related items: Implementing relationships between data provided content isn’t too tricky – one thing to be careful of, make sure the related item data provider is patched in before the destination items. Otherwise your lookups will fail

Item ids: Chances are you won’t be the only person working on the codebase. You might be lucky and your source data contains Id’s which are Guids – this works well because the Sitecore items can then be assigned the same Guid ensuring everyone gets the same tree. If that’s not possible you might want to consider generating a Guid from the data you have.

The data we had contained an ISBN number so all our item Id’s became ISBNNumber+0’s e.g. {97807234-1576-3000-0000-000000000000}. If you don’t have a distinct key like this there are ways to generate deterministic guid’s from a string however you stand a fair chance of duplicates if the ID value you use is common or exists in more than one place.

Saving (enriching) content: Unless you implement public override bool SaveItem then any changes you make to the content will simply be overriden. The parameters of SaveItem give you plenty of information should you need to fire data back to the source, or in our case, back to an interim mongo db.

API Access: So, what happens if the API you are using goes AWOL. Hopefully not a common scenario, but one you don’t want to ignore. In our scenario we only had access to the client’s api’s when connected through a volatile vpn connection. To speed up local dev I harvested a good spread of data to an interim db (mongo) which I could then work on locally.

Debugging what’s going on: This may well be specific to my implementation, but I couldn’t find a good way to debug data providers efficiently. The debugger would take forever to reach breakpoints.

Being a good citizen: All data providers will run, one after another. You can prevent others via context.Abort(); so be mindful your new operations are as lean as possible.

The IDTable: Be careful, this can become stale if you are working in dev – don’t be surprised if you nuke it several times. If you’ve sorted the ItemId issue above this becomes less of an issue. The more data = more sql calls – fire up profiler and watch the calls fly! I’d experimented with a static cache over the whole table however maintaining it’s consistency proved messy, and out of the scope of the POC. I do think the idea has legs so if taken further would definitely be an area for investigation.

Some ‘ah, that was easy’ moments:

Indexing: Once published, indexing works a treat. In the web db all items exist as proper Sitecore items.

Adding more data providers: I’d set things up so that common operations were squirreled away into a base class. Adding new types of content was then trivial with only a very light subset of methods required – this meant linking up more related types became trivial.

So, in summary

Conceptually Data Providers are great. However, in practice they can be tricky to get right especially for large data sets! You may find calling api’s on the fly and * items give you everything you need, especially as you can easily achieve caching for * items with https://blog.boro2g.co.uk/sitecore-custom-sublayout-cache-key/

Updating the Sitecore Quick Info panel

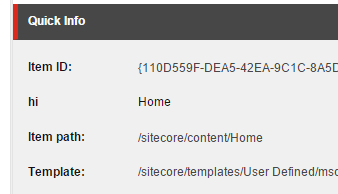
There was a thread on Stack Overflow asking whether you could update the Sitecore quick info panel. I thought it would be interesting to write up one approach that didn’t involve de-compiling reams of source code.

The whole content editor runs in the DOM so any web technique for manipulation (with a bit of iframe traversal) should get you going.

To get the following code working, add the following js to content manager.aspx (/sitecore/shell/applications/content manager):

I doubt you’d want the message to say ‘hi’ but hopefully this highlights how you can start to manipulate the panel – either editing the existing or adding nodes as required.

If you roll this out to production I’d suggest revising the xpath to ensure its neat enough for your liking.
quickinfo

Building on this idea, simply updating the labels is probably pretty use(less)ful?!? To take the concept further you could find the items ID via similar means above and then pass that back as a parameter to an ajax call to get more aggregated or more information on the item.

Documenting webapi with Swagger

If you’ve ever worked with webservices, chances are you’ve run into WSDL (http://www.w3.org/TR/wsdl). In the webapi world you don’t get so much out the box – this is where swagger can help expose test methods, documentation and a lot more.

For asp.net projects you can make use of a library: https://github.com/domaindrivendev/Swashbuckle. Install via nuget and you get a UI allowing a configurable interaction with all the webapi methods in your solution:

The swagger UI:
swagger ui

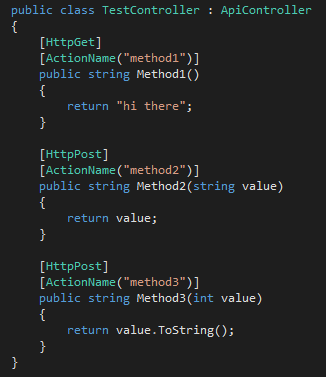
The test controller and methods:
webapi methods

All pretty simple stuff – how about if you want to secure things?
An example scenario might be you only want swagger accessible if you are visiting via http://localhost (or a loopback url).

It’s straight forwards if you implement a custom webapi DelegatingHandler.

This then needs wiring into the webapi request pipelines. In your WebApiConfig file (OTB in your solution in the folder: App_Start) add:

In the TestController example above we had several httpPost methods available – to enable this functionality you need to allow the routes to include the {action} url chunk.

Azure webapi’s are now compatible with swagger – see https://azure.microsoft.com/en-gb/documentation/articles/app-service-dotnet-create-api-app/ for more info.

Sugcon NA 2015 – Sitecore User Group Conference

The last week has been packed with all kinds of Sitecore goodness. Firstly the Sitecore MVP summit and then the Sugcon NA Sitecore user group conference, both hosted in New Orleans. Re-adjusting to the UK timezone has been interesting but well worth the trip 🙂

Here are a few stats on the Sugcon event – a great success by all accounts. http://www.akshaysura.com/2015/10/02/sugcon-sitecore-user-group-conference-status-rocked-it/

sugcon_na_logo

What really stood out was how much cool stuff is being done by Sitecore and even more, all the partners around the world. Even if the ideas weren’t closely aligned with the sites we build its great to see the direction people are taking the platform.

I even got to show a few of the ideas we’ve been working on recently. From the questions at the end we aren’t the only ones trying similar things. Phew!

There should be some slides available soon from the different sessions so do keep an eye out. The tricky thing was choosing which sessions to visit with 3/4 concurrent ones all the time. Here’s a quick summary of the ones I did catch:

  • The importance of component modularity
    • http://www.brainjocks.com/company/score
    • http://bradfrost.com/blog/post/atomic-web-design/
    • Brainjocks have developed a custom development framework – SCORE. The talk wasn’t primarily based on SCORE but ran through the kind of issues and ideas they’d had to tackle during it’s development. The crux of the presentation was to decompose your pages & components into atoms, then gradually pool them together into molecules, organisms, templates and ultimately pages. Think of an atom as a button / a textbox / a title field. Entities could then talk amongst themselves via js pub/sub events.
  • Unicorn 3 and transparent sync
    • https://github.com/kamsar/Unicorn
    • We’ve been using previous versions of Unicorn across a few projects recently so was great to see what Kam had brewed up for the latest version. To work around merge difficulties of Sitecore’s default serialization format the whole thing has been underwritten with Rainbow – a YAML serialization format for Sitecore items. Live GIT demo’s between branches was pretty bold but paid off, especially when transparent sync was demo’d – the recipient of the branch didn’t even need to run a sync page to pick up the latest changes from another branch.
  • How to best setup Sitecore unit tests and the different options available
    • https://github.com/sergeyshushlyapin/Sitecore.FakeDb
    • Let’s count the ‘usings’ – often a telling sign as to the coupling in your code. Kern had found some good 404 handling code (*good as in: this is an interesting challenge – do not try this at home but makes for useful demo fodder). Different options for how to test were shown off: Microsoft Fakes vs. Sitecore Fake DB vs. Custom refactoring. Each had it’s benefits and costs. If you’ve not checked out Fake DB yet I’d highly recommend it.
  • Personalization driven by machine learning
    • https://www.markstiles.net/Blog/2014/08/26/I-Sitecore-Integrating-Machine-Learning.aspx
    • There are certain areas of IT that just blow your mind & this was definitely one for me! The idea here was great – your system self evolves to select and report back on which content fits the users best. It might sound trivial but under the hood things move in complex ways – all based around a genetic algorithm (this was my WTF moment!). The more visitors interact, the more the system understands you and the underlying dataset. This was surfaced in a few ways, via in-page debug details, the actual page content and finally some custom UI’s for editors. The implementation hadn’t quite got live yet, it will be interesting to see how it performs when scaled and receiving real traffic.
  • Store your media in S3
    • https://aws.amazon.com/documentation/s3/
    • If you want to distribute your media, then serve with scaling and different compression’s this talk was a good introduction. Ben showed off custom implementations that allowed media to be pushed directly to S3 and then transformed as required when rendered into your pages. It’s early days but I have a feeling this kind of thing will become a lot more prevalent in the near future.
  • Under the hood with Mongo
    • http://docs.mongodb.org/manual/core/storage/
    • Eminem & Snoop karaoke, Lars tribute video’s and hidden sound effects! Yes, this was a Mongo talk but not like many I’ve seen before 🙂 Sean ran through information on the different storage options available since the release of Mongo 3.0 – primarily wiredTiger vs
      MMAPv1. A key thing to take away, one size doesn’t fit all – your choice of storage engine really depends on what you find when you profile your application & the data residing in your infrastructure.
  • Javascript overload (es6, javascript pipelines, javascript in speak)
    • https://github.com/lukehoban/es6features
    • If like me you struggle to keep up with all the new Javascript libraries, frameworks and techniques – this was a great eye opener for how fast its all evolving and improving. Through a variety of sourceMap’s and transpilers some of the latest syntax and features can be used in modern browsers. You could tell Pavel really knew his stuff here, when asked to pick one language to work with for the next 10 years, well, you can probably guess 🙂

There were some great topics on show at Sugcon, it was great to see the diversity and all the ideas people are coming up with! I’d highly recommend going to the next ones if you get the opportunity.

Sitecore FXM Page filters & matcher rules

Since the launch of Sitecore 8, Sitecore have enabled a neat feature that opens up some rather interesting possibilities in terms of how you can track user behaviour and personalize non-sitecore sites.

The federated experience manager (FXM) is now fully integrated into the product. To configure you need to specify the remote site domain, take the tracking beacon and install into markup on the remote site. The beacon is simply a script tag with its url pointing back to your Sitecore application e.g.:

<script src=”//###.url.com/bundle/beacon”></script>

Within the experience editor you then have the ability to create virtual placeholders for the pages. Into these placeholders you can then add: sublayouts, renderings etc. Much like you would on regular Sitecore pages.

The items you create that define the placeholders and filters for the external sites live in ‘/sitecore/system/Marketing Control Panel/FXM’

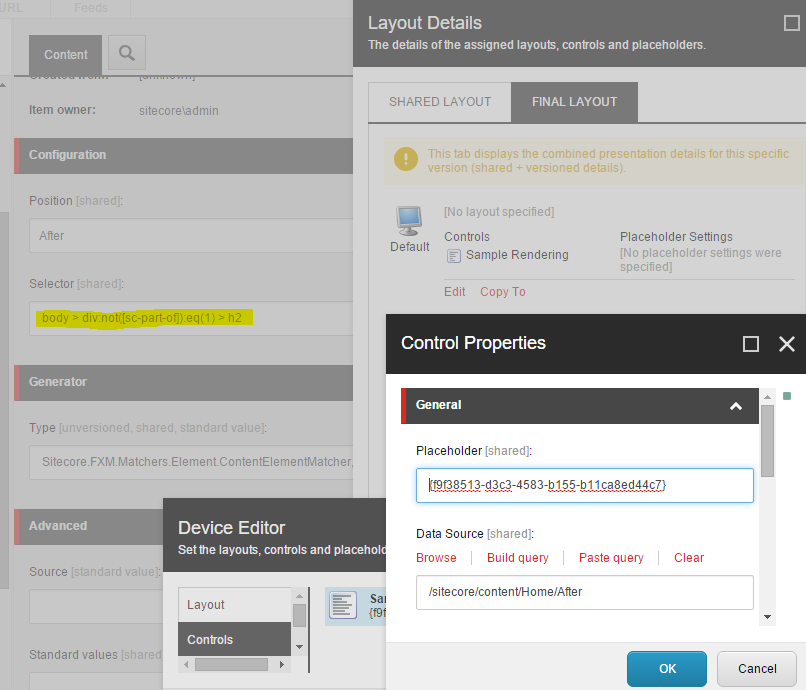
The scenario I was testing involved simply adding some text after my H2 tag in my external site, purely for some ‘hello world’ eqsue testing.

This was all done through the Experience Editor. The css selector is highlighted below. If you dig into the presentation details for the item you can see how it’s been configured with the sample rendering and datasource ‘/sitecore/content/Home/After’

Note, I ran into issue when editing the presentation details here as you were forced to select a layout. I’ve been in touch with Sitecore around this, if you select any layout the beacon didn’t appear to return the correct markup.

fxm1

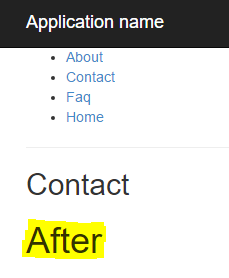
Great, I can now publish the site and see my after content showing on an mvc app:

fxm1.1

However, if I visit any of the pages in my site the same text shows. In my scenario I only wanted the text to show on the contact page, not about, faq etc.

Within the experience editor you can create ‘page filters’. These allow you to build a bit more structure into the setup. Having created one of these, you then need to nest the ‘Element placeholder’ under it and publish:

fxm2

Note, I couldn’t find a way to nest the placeholders under the matcher rules within the experience editor.

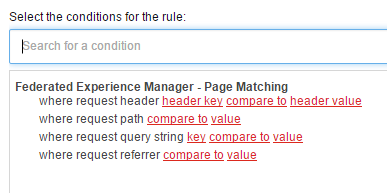
The matcher rules allow a good variety of options for restricting things, and as with Sitecore you can always add your own 🙂

fxm3

It’s only early days for FXM but I’m sure we can expect some pretty neat things to come!

Some follow on queries and next steps in testing things out:

  • How to scale FXM
    • Which boxes receive the most load
    • Could we have a specific FXM set of delivery boxes?
  • How can we pass custom data back through the beacon?

For more info see https://doc.sitecore.net/sitecore%20experience%20platform/federated%20experience%20manager