The topics cover things like what it’s like to move from being a traditional Sitecore dev to a JSS dev, how to get everything deployed, any gotchas we didn’t estimate for when we started and some key design decisions we made along the way.
If JSS is a new term for you, I’d seriously recommend checking our the documentation that Sitecore have provided: https://jss.sitecore.com/ .
By the end of this post we’ll have run through how you can get JSS up and running locally, with dependencies all wired together using a DI container and any functional aspects written in TypeScript. For us this is a key set of requirements – we’ve worked with many projects that have grown over several years. By putting in some key rules and requirements up front should mean with good discipline that the codebase can scale over time.
Why JSS?
Imagine a standard Sitecore development team, typically based around C# developers and some front end devs. In the default approach to building a site you’d need everyone to contribute Razor files with the markup and associated styling and functionality. This is the approach you would probably have seen for several years until more recently with the demand for richer front end technologies. Think Vue, Angular, React and so on.
This is what JSS facilitates.
Is this right for everyone?
Just because technologies exist, it doesn’t always make them the right platform to jump on. E.g. if you have a very established Sitecore development team that doesn’t have the appetite for these front end technologies, then JSS might not be the thing for you.
Getting started
The quick start from the docs site provides 4 tasks to get you started:
1
2
3
4
npm install-g@sitecore-jss/sitecore-jss-cli
jss create my-first-jss-app vue
cd my-first-jss-app
jss start
Provided you have node installed, once you run ^ you should then see http://localhost:3000 fire up.
Why TypeScript?
I wouldn’t consider starting a new web project now without TypeScript as it provides so many useful features for a codebase. Refactoring is just like if you were using C#, variables have types, classes can implement other abstract classes or interfaces. If you’ve not used it before, I’d highly recommend it.
In terms of designing your application, another key factor to consider is the coupling between the different layers. Core functionality being one layer, your UI framework being another. If you structure things so that e.g. you can peel out Vue without too much trouble, moving up through different technologies or versions will be a breeze.
Changes to the default app
Here we’ll add things like some demo services, some DI registrations and a few other bits we’ll need.
After all that, you should see the homepage load up and “ServiceA” getting logged to the console. Not the most impressive output but shows the full flow of dependencies getting configured and resolved, with all the code written in TypeScript 🙂
If you are using SSR Renderings, you’ll also need to add |ts into the list of rules that get ‘unshift’ed in /server/server.vue.config.js
The previous post detailed how you can debug the server side aspects of the Marketing Automation agent. If you start experimenting with richer functionality, I’m sure you’ll soon want to create your own custom activities and UI’s.
Sitecore provide a good description of doing this in their documentation.
Adding custom fields to the UI
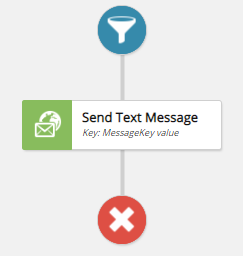
In my demo activity, I needed to include a MessageKey that would be passed through to the backend engine. Getting the field to show was relatively easy if you follow the example. I’d also recommend checking out this repo.
The problem I hit was getting the MessageKey value to render correctly in the UI when I opened a plan for the second time – rather than seeing the Key displayed as expected, you’d see an empty block.
Missing key valueShowing the key value
Why was this?
Well, it turns out the MessageKey != messageKey . For some reason, when you write your custom typescript activity, you need to reference ‘this.editorParams.messageKey’, not ‘this.editorParams.MessageKey’. Note the capital, or lack of, M.
Missing bits of Sitecore
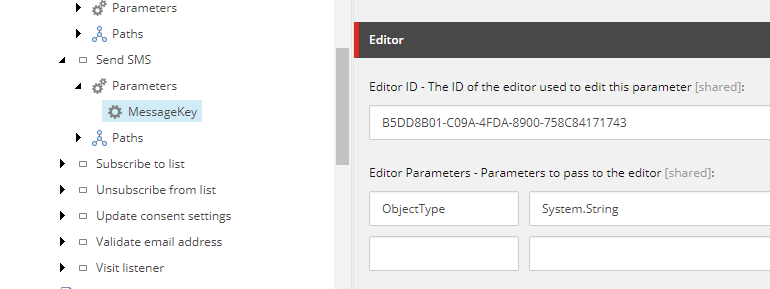
One thing the docs doesn’t mention is when you create your custom parameter within the Sitecore tree, you need to set a couple additional fields (Editor ID, Editor Parameters). Have a look at some existing ones for more details.
Debugging the UI
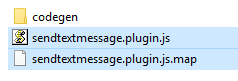
How did I spot the issue with the M? Once you’ve built your plugin js (npm run dev) you get a minified js file to deploy. Alongside this you will also get a sourcemap file:
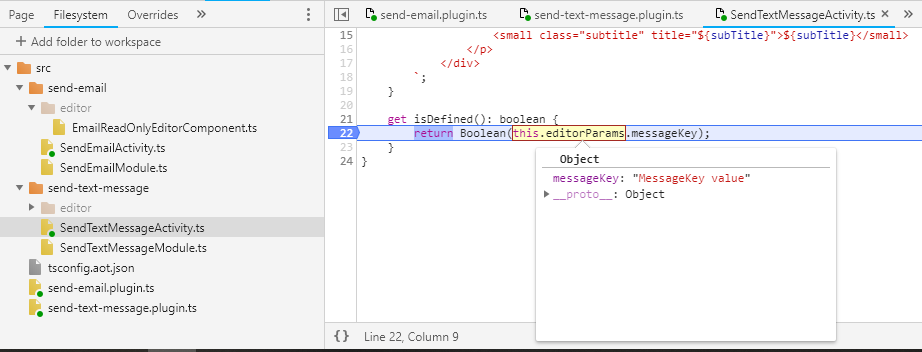
If you copy this to the same folder as your deployed plugin, you can then do some clever things in chrome:
In order for this to work you need to:
Deploy the sourcemap file as per above
Add the folder where the original TS files live into chrome
In the diagram above => Filesystem => Add folder to workspace
There are a few ways to run the engine – by default it gets installed as a windows service however if you navigate to:
{xconnectdeployment}\App_data\jobs\continuous\AutomationEngine there is an exe (maengine.exe) you can run instead. Your code deployment will involve copying dll’s from your solution into that same folder.
To debug, run the console app and then attach to the maengine process within visual studio. When the plans run, and your activity is triggered, you should see breakpoints kick in.
If you want to make attaching to the engine simpler, in Visual Studio ‘Add existing project‘ => Select the maengine.exe on disk => Right click ‘Debug => Start new instance‘
Some developer tips
If you are getting started and can’t seem to get your code to run, try setting up a very simple plan with a loose trigger. An example trigger, where the month is October.
Also, check the custom config is in place to link your custom code with the GUID of the new activity within Sitecore. This needs to live in {xconnectdeployment}\App_data\jobs\continuous \AutomationEngine\App_Data\Config\sitecore\PatchFolder – you can call the PatchFolder what you need.
And finally, if you want to see what Sitecore is storing under the hood when you save a plan, they live in /sitecore/system/Marketing Control Panel/Automation Plans. You can always un-bucket the folder to see each plan.
One issue that seems to regularly occur in Sitecore builds is pages showing $name in the content. Its the sort of problem that seems to creep into projects the further through you get.
Why does it happen?
When you setup Sitecore templates they are typically built up from several other templates eg:
A content page is comprised from:
Page Title field section
Meta Data field section
etc
Down the line you decide you want to add ‘Page Content – (Header and Body fields)’ to all pages so you setup a new Field Section template along with corresponding fields and __standard values. So that new pages automatically push the item name to the Header field, you set the __standard values to contain $name.
All this gets published and you then come to check the front end of the site – pages created before adding the Page Content field section now have the new header and body fields but the header field shows $name 🙁
When items are created they are processed by a set of pipelines. An example of this is expandInitialFieldValue pipeline. Out the box, this makes use of the MasterVariablesReplacer.
You now have a couple options, either you can call the MasterVariablesReplacer for the problematic items or you could manually script the same functionality. The following code demonstrates the manual approach:
Its worth noting this can introduce some interesting challenges if Language Fallback is used on your site. The script above works fine for content items on a single language site. If you need similar functionality when language fallback is in place it may actually be meaningful to set $name = ” for non-primary languages. This will ensure the fallback will occur correctly, rather than finding $name and thinking it is valid content.
The aim of this post is to highlight some pitfalls I have run into in the past when working with the Sitecore API. Hopefully some ideas demonstrated here will help people avoid some common mistakes when programming with Sitecore.
Over time I’d like this list to grow so if anyone has any feedback or suggestions for more items, please let me know.
For each item I will highlight some examples of where I have seen the mistakes and how they can best be avoided.
Direct database access
Expensive content queries
1. Direct database access
There are several ways to get a reference to a Sitecore database. Note, these are defined within the config (<databases>). In the following example, the first 2 items get a specific database, the last the context database.
One of key steps in these documents is that the content delivery site only has a reference to the web database. Typically you would have an independent content authoring environment which has references to core, master and web. In this setup, if your code has a direct reference to master, you will get an exception since master doesnt exist.
When might you want to do this?
It may be that in certain circumstances you do want to target a specific database. Consider an import routine. In this example you would want to ensure that new items are only added to master – note you would need to ensure the import routine is run from an environment which can access the master database.
2. Expensive content queries
Sitecore.Data.Items.ItemAxes exposes a set of methods which can be used to drill up and down through the content tree. Some examples of this are:
1
2
3
4
5
6
7
8
9
10
11
12
13
14
15
16
17
18
19
20
21
22
23
24
25
26
27
28
29
30
31
32
33
34
35
36
37
38
39
40
41
42
43
44
45
46
47
namespaceSitecore.Data.Items
{
// Summary:
// Provides access to other items relative to a source item.
//
// Remarks:
// Implements the Sitecore.Data.Items.Item.Axes property.
Why is this bad?
If your content tree contains thousands of content items and you call GetDescendants from the root node – you will effectively be loading every single item in the tree – I can guarantee the bigger the tree, the slower this will go!
When might you want to do this?
If you are comfortable that the result of a descendants call will expose a controlled set of nodes then you may find them more useful than querying direct children. An example of this is if folders are used in the structure you are querying.
Where might you make this mistake?
A typical place I have seen this implemented is building footer navigation. Consider the following: ‘A developer understands your template structure and sees there is a common base template for each page so adds a new checkbox ‘Show in footer navigation’. In the footer control they then start at the home node calling GetDescendants, checking each item for the new checkbox.‘
What can I do instead?
In the footer example, try to consider alternative solutions for defining which items should be shown in the footer. How about a configuration area of the content tree where the footer navigation is defined as its own node (and children if needed). Your descendants call could then target these specific items.
Other alternatives are using shallower axes for your queries for example: direct children or siblings.
This post aims to demonstrate how to add new versions for all languages if they dont exist in the cms.
When you click buttons within the Sitecore client, typically Sitecore commands are used to map these actions to c# code. This link is defined in /App_Config/Commands.config. Some sample entries here are:
If you want to add your own commands you can either edit this file or setup a patch file in /App_Config/Include. Note the patch file is the preferable option.
If you want this functionality available from a cms button, you need to wire up the button to the command. To do this, switch to the core database.
In this example we will add to the Language chunk of the ribbon (/sitecore/content/Applications/Content Editor/Ribbons/Chunks/Language). You need to create a new button and then setup the data section paying close attention to the Command field. This wants to be the same value as set in the patch file (item:addversiontoalllanguages).
A quick tip for checking data flowing through the Sitecore pipelines is to setup empty processors and then move them sequentially through the required pipeline.
Sitecore gutters are a great way of seeing quick summaries of content within the tree. Some existing gutter options include Locked Items, Workflow State, Missing Versions and more. These can be toggled by right clicking in the left column of the content editor.
Its easy to build custom gutters – in the example above we have a new item available – ‘Custom Presentation’. When this is active on an item it shows:
Behind the scenes there is very little code to achieve this:
1
2
3
4
5
6
7
8
9
10
11
12
13
14
15
16
17
18
19
20
21
22
23
24
25
26
27
28
29
30
31
32
33
34
35
36
37
38
39
40
41
42
43
44
using System;
using System.Linq;
using###.DataSource.Cms;
using Sitecore;
using Sitecore.Data.Fields;
using Sitecore.Data.Items;
using Sitecore.Diagnostics;
using Sitecore.Globalization;
using Sitecore.Shell.Applications.ContentEditor.Gutters;
One of Sitecore’s most useful features is the plug-ability of functionality via the configuration factory. Its very easy to add or update custom implementations where necessary.
A typical programming model used throughout this is the Provider model – Membership, Roles, Item, Proxy… the list is endless. Unfortunately one provider thats not exposed in the config factory is the MediaProvider.
No problem, thanks to some help from support they suggested a way to get around this, you can tap into the initialise pipeline. Here is the patch file to enable this: