TypeScript mixins

This popped into my news feed a couple days ago and it seemed like a really neat feature that’s been added into version 2.2. of TypeScript – the concept of mixins.

This terminology (mixin) has been available in SASS for quite a while and provides the ability to extend functionality by composing functionality from various sources. This same concept holds true in TypeScript.

A few examples based off a User class:

Now a couple mixins:

The first adds the ability to ‘tag’ the base class, the second exposes a couple methods to activate/deactivate the class.

Pulling this together you can then create basic TaggableUser:

Or an ActivatableUser:

Or even better, a combination of both:

Pretty neat huh?

The inspiration for this came from https://blog.mariusschulz.com/2017/05/26/typescript-2-2-mixin-classes

Newtonsoft – deserializing POCO objects that contain interfaces

Just a quick post here but hopefully helpful if you hit the same issue. If you are dealing with json serialization, newtonsoft is one of our goto options.

When deserializing json to poco’s, sometimes the structure of your poco’s require a bit of extra setup to play fair with newtonsoft. Consider the following objects:

So when this gets serialized, you’d end up with:

If you then try to deserialize:

then you will get an exception.

The solution is to setup a converter:

Which then gets passed into the deserialize call e.g.:

Then you can simply add as many InterfaceConverter’s as you need

Scan large S3 bucket with node js and AWS lambda

AWS lamdba’s are a really cool way to remove the need for specific hardware when running things like scheduled operations. The challenge we had was to find the latest 2 files in a large bucket which matched specific key prefixes. This is easy enough on smaller buckets as the listObjectsV2 call is limited to return 1000 items. What to do if you need to scan more?

The following example shows how you can achieve this. You need to fill in a couple parts:

  • the bucket name
  • the filename / folder prefix
  • the file suffixes

What’s really neat with Lambda’s is you can pass in parameters from the test event e.g.:

When this runs it will fire off SNS alerts if it finds the files to be out of date.

The key bit is the recursive calls in GetLatestFiles which finally triggers the callback from the parent function (ie the promise in GetLatestFileForType).


Sinj – scripted Sitecore changes

This post follows on from Migrating Sitecore content and looks to explain the way we migrate content between different environments.

Sinj is the framework we’ve put in place to facilitate a re-playable and scripted approach to any Sitecore changes. It enables you to create changesets via JSON/Javascript which then get run against a Sitecore authoring environment and any counterpart publishing targets. The code can be found at https://github.com/tcuk/sinj.

For any setup instructions have a look a the wiki on github. It also contains examples of the different kinds of operations you can run against your content. As the js layer talks into the Sitecore API, if you find there is an operation you need to perform but can’t it can simply be extended to add the desired functionality.

An example script for creating a template would be:

Now this may seem overly verbose however there are easy ways to speed up the JSON generation. I’ll cover these in a subsequent post.

For me the real advantages we gain from this approach are:

  • Changes are as granular as you want – they can be applied to specific fields in specific languages on specific versions if desired.
    • However, if you want to update all languages in one go, its simply a case of iterating through each language in a for loop
  • Bulk sets of changes can be applied in one go. By simply including all the JS files you wish to deploy in one folder then all will get applied in sequence
  • You can run the scripts to any database, avoiding any need to publish scattered areas of the tree
  • Changesets can be replayable and don’t have the somewhat confusing concept of: overwrite/merge (and it’s options)
  • You can query the Sitecore tree to gather data to feed into other updates

In the next post I’ll show some examples of how creating Sinj scripts can become a lot simpler…

Migrating Sitecore content

It’s something everyone’s had to do at some point. How can you best migrate content from your dev machine to other environments e.g. qa / uat / live etc.

Before we carry on let’s define exactly what we mean by content. I’m not talking about files here, let tools designed for deploying files handle that problem. By content I mean Sitecore items. These can be broken into two key areas:

  • content owned by content editors
    • typically items under /sitecore/content and /sitecore/media library
  • content owned by developers
    • typically items under /sitecore/layout, /sitecore/system and /sitecore/templates

In theory both can be migrated in exactly the same way – it’s out the box and is called packages. Via the desktop you can decide which items to package up and simply download a package file. The counterpart is you then install this package in other environments and you’ve migrated your content.

So, why a blog post on something you get for free?

A lot of the information here is based on experiences of migrating content between lots of environments, that’s been edited by lots of people in several different places. Trust me, packages work but can become somewhat cumbersome and error prone as you scale things up.

Some key factors it’s worth considering for the following discussion:

  • How easy is it to build up your changeset?
  • How quick is it to install these changes?
  • How easy is it to see which versions of your changeset have been installed?
  • What happens if you get a ‘merge’ conflict?
    • E.g. what happens if an item in your changeset has been updated in the destination environment
  • How easily can your changeset be source-controlled?
  • How easily can your changeset be updated / versioned?
  • How easy is it to deploy your changeset to your publishing targets?
  • Can the installation be clever?
    • E.g. could you add logic to the install process or even base content it installs on existing content

What options do you have?

Note, this list isn’t meant to be exhaustive so apologies if you think items are missing – it’s aim is to highlight answers to the list of questions above. Several tools solve these issues in similar ways. The pros and cons are based on field experience of using each.

Sitecore packages:

These are available to use in an out the box Sitecore installation. Creating packages can be based on cherry picking the items from a specific database you know have changed or basing on some dynamic rules (e.g. what’s changed recently).

Pros:

  • They are out the box and quick to get started with
  • You can open the output zip and peer in
  • It’s possible to save an xml file which represents the full content of a package

Cons:

  • Source controlling their content is tricky as they are output as a zip file
  • It can be tricky to get clear visibility of which version of packages have been installed to specific environments
  • Content still requires publishing if installed into master
  • Keeping them up-to-date with changes, especially with a large team can be laborious
  • Validating their content is slow
  • Installing lots of packages in one go is a painful process
  • Install options are somewhat unclear:
    • Overwrite can nuke existing content
    • Merge – does anyone really understand the 3 options?
  • Field level updates aren’t possible

Sitecore update files:

Much like packages update files store a form of serialized content in zip files. There isn’t a way to generate update files out the box so I won’t dwell too much on this option. IMO they suffer many of the same issues as packages.

FYI TDS allows you to generate these files. 

Pros:

  • Partial item updates can be achieved
  • You get detailed installation history and (undocumented) rollback options in the /temp folder

Cons:

  • You can’t simply generate this type of file

Unicorn / TDS:

Unicorn and TDS take a slightly different approach in that they store a view of the world in your solution. Both rely on serialization to generate a view of configurable areas of the tree, Unicorn diverting slightly by using a custom yaml format for its files.

Installing each is slightly different: Unicorn hosts a custom page that allows manual or automatic syncing of files, TDS allows you to generate update files.

I’d argue both these approaches suit developer content well, I’ve struggled storing large amounts of content editor content in both.

Pros:

  • Source control is your view of the truth – items can be branched & merged along with your code
  • The deployment process can be automated

Cons:

  • TDS does come with an additional cost
  • Deploying to all publishing targets requires the changeset to include content configured for each target
  • In TDS building more complex installation rules is possible however difficult to visualize (note, I’ve not used the product for a couple years now, this may well be better)
    • Examples in mind would be: sync once, field level configuration

Scripting your changes:

You build up custom scripts / helper pages / ???? to allow changes to be made via the Sitecore api’s (or database if you are feeling particularly Chuck Norris). Let’s assume we have a means for scripting these changes via some some json configuration (see the summary :)).

Pros:

  • If done right you get an easily re-playable process that can update content in any publishing target
  • All the scripts are source-controlled
  • Scripts can base decisions on existing content
  • Scripts can be as granular or as course as you want – bulk updates on multiple items vs single field updates on specific items

Cons:

  • Every change requires ‘scripting’
  • A considerable shift in approach is required
  • A raft of external tooling is required to facilitate generating and installing scripts

Summary, or should it be sales pitch?

We use the last approach across most dev teams here so would be used for countless deployments per day. For us it works and is infinitely re-playable. Think of it like advanced config transforms for your content.

I’ll write up more details on the specifics of sinj in a later post – to get started have a look at https://github.com/tcuk/sinj

I’m hoping the information above gets you thinking – just because certain tools exist doesn’t always guarantee they are the best for the job!

bad idea


Performance tuning and load testing xDB

I’ve recently been trying to explain the life of a developer to my fiance, in particular the recent work we’ve been doing around load testing xDB. She suggested a rather apt metaphor for the problem: tummy pants – you prod and poke one area, then another starts to bulge.

Female fashion aside the metaphor feels rather accurate, especially as you add more components to a system. Lets consider the evolution of Sitecore. Originally you had a relatively simple model: sql servers and web servers. Since the advent of xDB this landscape shifts – you now need to consider things like: mongo, shared/private session, solr, reporting services, aggregation services, the list goes on.

Recently we’ve been through a long phase of load testing – the primary focus: can we get personalized content to the customer quickly and reliably? In short, yes – but it took a lot of test runs to get there! Sitecore have a white paper on load testing they ran, it’s worth having a read: https://doc.sitecore.net/White_papers

The goal:

The client in question has a really good track record of focusing on key parts of the development lifecycle such as load testing – their main sales outlet is the web so keeping online customers happy is rather high on their list of priorities. Based on this we often have a load test phase prior to deploying new applications or even when new features are added to the existing code base.

We had a clear target to achieve based on their existing online profile: 250 transactions per second with average response times sub 2s. There were more non-functional requirements but for the scope of this post they aren’t really important.

The setup:

All the testing was performed against boxes hosted in AWS. The load tests were run via 2 means, custom AWS boxes running jMeter and VS Online Load Tests. We had control over the VS tests, an external company was running the jMeter tests – this allowed us to quickly iterate our approach and finally get sign off once we were happy with our setup.

For AWS box specs have a look at https://aws.amazon.com/ec2/instance-types/. Its worth noting we are looking to trim back the sizes of each – now we’ve achieved the target we can simplify and tune back specs and therefore cost.

  • Web boxes: 3 / 5 / 7 web boxes – c4.2xlarge
  • Sql boxes: 1 (for core, master, web, session) – c4.2xlarge
  • xDB cluster: 3 – i2.xlarge linux
    • Mongo configured to use wiredTiger. When mmap1 was used we’d see large numbers of collection locks during test runs.
  • This was all monitored via New Relic via their free 24hr retention account

How did we get on?

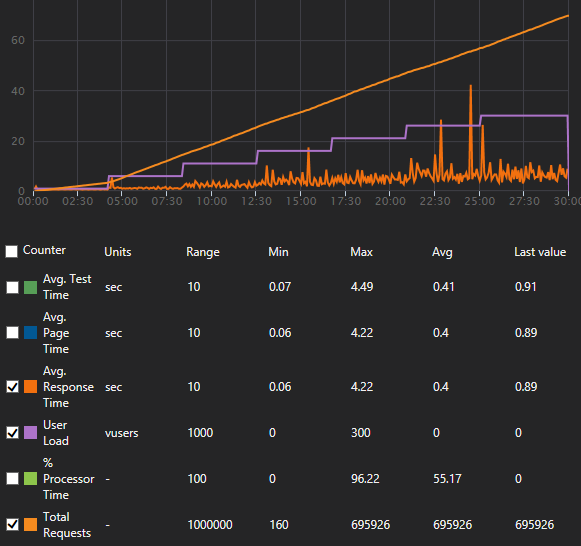
Initially pretty badly! We’d see stable response times under light load but as soon as we started to move up the load ramps this would quickly tail off – graphs would look a lot like:

graph

The overall average response times were ok but things really started to tail off towards the end.

Where did we get to?

By the end things were much rosier, we could get a lot more stable response times right through the test ramps. Note the number of requests we managed to handle between the 2 runs:

graph

Now it’s worth noting, we could perform the same test twice and get variations in results. Please don’t use the exact figures as gospel, they are more to indicate the improvements we managed to achieve – avg response times halved! 🙂

Tummy pants?!?!

We ran several iterations of tests against different spec boxes, and combinations of boxes. Quite a common issue we’d find would be you scale up one aspect which then moves the bottleneck elsewhere. More web boxes wouldn’t necessarily buy you better results, bigger mongo boxes (even with promises of vast quantities of iops) may have little marked effect. We prodded one area and the problem appeared to move around.

How did we achieve the improvement?

It took a combination of a few things: some help and guidance from the guys at Sitecore that were involved in the load testing shown in the white paper listed above and some reconfiguration of the setup.

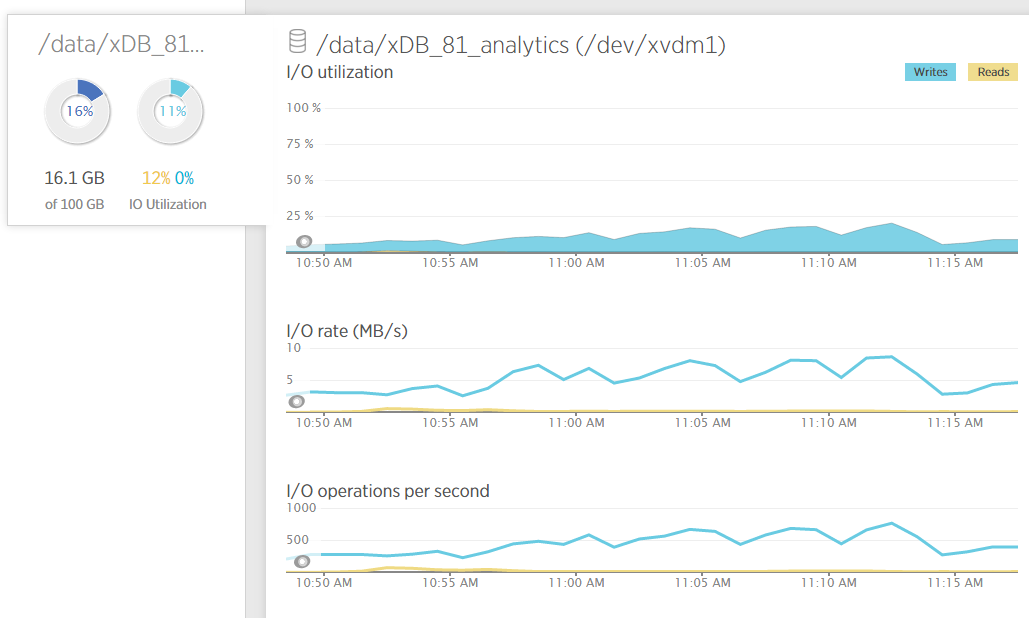
As we tweaked the setup one area that remained unclear was the way the linux boxes were handling each collection. Mongo allows you to create your own collections, in the Sitecore model things like analytics. It also maintains its own collections for things like replication. The wiredTiger storage engine is I/O heavy on the disk as documents are pulled to and from the disk when updates are issued.

In order to measure and tweak exactly what mongo was doing we made a few changes:

Prior to making these changes I had little experience of working with linux. It took a while, and a fair amount of googling to find the best resources. There are some good tools to help get going: putty and winscp.

Tuning the changes

New relic proved invaluable when diagnosing each disk’s resource usage. The next step for us will be to reduce the pre-allocated iops assigned to each collection so it suits the details below.

iops

tl:dr;

When you load test a system it’s key to get a clear picture of what is going on. Tools like New Relic are great for aggregating the performance of different components. That holds true for both windows and linux installs.

For your Mongo instances assigning different performance to each collection will give you much better visibility and much more fine grained control over each collection. In our testing this resulted in halving our average response times.

Real time view of the Sitecore log files

Just a quick post – if you want to get a realtime view of the log files then you have a few options.

If like me you find opening the latest file and scrolling to the bottom a bit tiresome then the following options might help:

  1. Dynamic log viewer – I discovered this tool as this ships with SIM – alternatively you can download the exe from http://www.softpedia.com/get/Office-tools/Text-editors/Dynamic-Log-Viewer.shtml. You need to select the latest file and it then watches the tail of the log file
  2. DebugView – you need a couple things – the download from https://technet.microsoft.com/en-us/sysinternals/debugview.aspx  and a slight tweak to your log4net config to add a new appender (see below). The advantage here is the log always updates, you don’t need to select a new file each rebuild. When you run the app,
    1. Run as an administrator
    2. Turn on ‘Capture -> Capture Global Win32’
    3. Add a filter to match your config – ‘Edit -> Filter/Highlight -> Include – [xDBPrototype]

The new config you need adds a new appender into the <log4net> section of the web.config/sitecore.config (depending on your version of Sitecore):

Enjoy

Sitecore Redis SessionState provider

Out the box Sitecore offers 3 options for how to handle session when you setup xDB. One option is to keep things in process (inProc). This is ok for testing in dev but isn’t suitable when you have > 1 front end content delivery nodes as each box wouldn’t be able to share the same information. The other two options are: Sql Server or Mongo. See the docs site for more information on how to configure these 2 approaches.

I’ve uploaded an early version of a Sitecore Redis SessionProvider to github: https://github.com/boro2g/Sitecore-Redis-Session-Provider

Conceptually the implementation of Session_End is easy to get your head around – when keys expire you raise up the corresponding events and Sitecore handles the rest. Redis makes this tricky as when keys timeout they don’t raise events and also the data is then gone, so how could it get flushed to xDB?

To work around this I’ve combined the logic in the SitecoreSessionStateStoreProvider which gives you the ability to poll the repository, along with some custom keys to manage the concept of expiration.

By default the asp.net redis implementation creates 3 types of keys:

  • DataKey e.g. “{” + applicationName + “_” + id + “}_Data”
  • LockKey e.g. “{” + applicationName + “_” + id + “}_Write_Lock”;
  • InternalKey e.g. “{” + applicationName + “_” + id + “}_Internal”;

The new entries will also be:

  • _log: this is a sorted set that keeps a record of all the marker sets
  • TimeoutKey e.g. “{” + applicationName + “_” + id + “}_Timeout”
  • MarkerKey e.g. yyyy MM dd HH:mm:ss_Marker
    • Note, this will contain sets of items (i.e. everything that expires at that time)

These new keys are used to store when items are added and updated. They are also then referenced in the callback to validate whether specific entries should expire.

In the solution there are the implementation details for the provider along with a console app for monitoring a solution.

console app

Do let us know how you get on! It’s worth noting this is currently an alpha release that’s undergone basic testing – any feedback / pull-requests would be greatly appreciated.

FYI If you want to get Redis running locally you can install via chocolatey: https://chocolatey.org/packages/redis-64

Octopus deploy – Script Steps sourced from a package

In the latest version of Octopus deploy you can now choose to run script steps where the files exist in a package. This might sound like a minor change but opens up some very neat options. You can read more on the details of the change in https://octopus.com/blog/octopus-deploy-3.3#ScriptsInPackages. Note at the time of writing this is only available in the beta of 3.3 (https://octopus.com/downloads/3.3.0-beta0001)

Ok, so why is this such a good thing?
Step templates are great – there is even a large library of pre-existing templates to download (https://library.octopusdeploy.com/#!/listing). If you’ve not used them before, step templates allow additional scripts to run during your deployment.

Examples could be: post to slack, create certain folders, delete given files etc. Basically anything you can achieve with powershell can be done in step templates.

Lets just stick with step templates then?
If you’ve gone through the process of setting up several deployments with Octopus and find you want to replicate the same functionality across several projects or installs then you need to re-create all the step template configurations each time. It’s not the slowest process but the idea below helps streamline things.

Now that you can run scripts from a package, why not source control the steps you want to run? One key advantage is that you can then see things like history of all the deployment steps.

What needs setting up?
You need to be running version 3.3 or higher of Octopus – see above for the link.

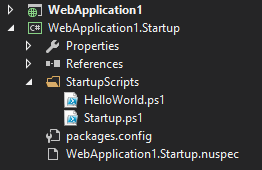
I’ve been using a simple test deployment of an out the box MVC project along with a new project specifically for the scripts.:
solution setup

In Octopus this has 2 steps:
steps

The first is a vanilla website deployment of ‘WebApplication1’. The second the startup scripts:
script step

Note the package id. The idea behind using a separate projects is that the powershell scripts never need to exist in the website project.

The startup script project
solution setup

I chose to use a class library for the simple reason that I could include a reference to Octopack and hence building the output nuget file was trivial.

The nuspec file is important as it tells the packaging to include all powershell files:

Packages simply contains a reference to Octopack:

And finally the scripts:
Helloworld.ps1

And the more important one, Startup.ps1

It’s worth noting this should be considered a POC of the approach. The next steps would be to split the scripts up into more meaningful units, remove hello world and update the nuspec with more valid information.

If you struggle with accessing the Octopus Parameters you require, the script in helloworld allows you to dump out all parameters and their values. In the startup script the parameter: $OctopusParameters[‘Octopus.Action[Deploy website].Output.Package.InstallationDirectoryPath’] depends on the name of your deployment in step 1 of your deployment process (Deploy website)