Why is choosing a CMS so damn hard?

Imagine the scenario – you start on a new feature or project and there is a need for dynamic content. Sounds simple right? Just pick a CMS platform, setup an account, update a bit of content, publish and you are done. Well, if only it was that simple! *

*Note – this post assumes that a platform like WordPress isn’t sufficient for your requirements

Where to start?

If you look at https://en.wikipedia.org/wiki/List_of_content_management_systems, it certainly won’t clear things up. There are a LOT of options! So, what sort of information should you use to feed into your decision process?

A few core CMS concepts

Before we go further, let’s define a few key concepts:

  • Headless Content Management System (CMS) – “A headless CMS is a content management system that provides a way to author content, but instead of having your content coupled to a particular output (like web page rendering), it provides your content as data over an API.” https://www.sanity.io/blog/headless-cms-explained
  • Digital Experience Platform (DXP) – “Gartner defines a digital experience platform (DXP) as an integrated set of technologies, based on a common platform, that provides a broad range of audiences with consistent, secure and personalized access to information and applications across many digital touchpoints.” https://www.gartner.com/reviews/market/digital-experience-platforms

It’s worth noting that certain vendors aim to fulfil both entries above, whereas others operate purely as headless, cloud native SAAS providers.

How to help you make a decision?

Ah, but what if the decision has already been made?

Within your team(s) or business(es), do you have an existing CMS? If so, can it be scaled or modified to serve your new needs. It’s worth considering that ‘scaled’ here covers many things – licensing, usability, modifiability, supportability, physical capacity and a raft more. This discussion often leads to some interesting outcomes and can easily expose issues, or the opposite, a positive view of existing tooling.

Ok, so we already successfully use CMS X

We’re getting warmer, but I’d suggest you still need to answer a few more questions:

  • Is it fit for purpose?
  • Do it’s content delivery approaches fit the needs of your new requirements?
  • Will the team that use the system be the same as the existing editors?

How to select a new CMS?

I’d recommend you build up your own criteria for assessing different tools, here are a few thought starters:

  • Cost
    • What are the license fees, and how do they scale?
      • Is it a consistent cost year by year?
      • What if you need more editors?
      • What if you need more content items, or media items?
      • What if you need to serve more traffic?
      • How much would a new environment cost?
    • How much does it cost to run and maintain the system?
      • What hosting costs will you incur?
      • How much does a release cost?
      • What cost lies with your different DR options?
      • How will the infra receive security patches and software upgrades?
      • What does an upgrade of the tool look like? Is it handled for you, or do you need to own an upgrade?
        • Note. This has stung us hard in the past with certain vendors!
    • How much effort/cost is required to set it up before you can focus on delivery of features to the customer?
  • Features
    • Does the tool support the features you require?
    • Or, does the tool come with features you don’t require?
      • This is an interesting point – are you buying a Ferrari when all you need is a Ford?
    • Are your competitors using the same tool?
      • Does it suit your business model?
    • What multi-lingual requirements do you have?
      • And how does that map to content and presentation?
  • Technology constraints
    • Are there any technology restrictions imposed by the tools
      • E.g. hosting options, language choices, CI/CD patterns, tooling constraints
      • Who owns the hosted platform, and how do backups work?
      • Does the location of data matter for your business?
  • Platform vs a tool
    • This ties into the concepts above, do you want a DXP or a headless CMS
    • Is a composable architecture desirable for your team(s)?
  • Out the box vs bespoke
    • What comes ‘for free’? And, do you even want the ‘free’ features?
      • If we think of enterprise platforms such as Sitecore, you get a lot OTB for free. E.g. the concept of sites, pipelines, commands and many more.
      • If you go down the headless route this lies in your dev teams hands.
  • Building a team
    • Can you even build a team around tool X?
    • Do you have in-house experience in the tool or associated tools?
  • Support
    • What if something goes wrong, what support can you get?
      • Note, I’d see support running from before you sign the contracts all the way through to post live ongoing support
  • Scalability, performance and common NFR’s
    • Will the tool scale and perform to your requirements?

It’s worth noting, this is not meant to be an exhaustive list – every project will have different requirements and metrics that get prioritized. The goal is to provide some thought starters in areas we’ve found useful in the past.

Finally, the fun part – rolling it out

Well, almost. Now the fun / hard part (omit for your preference :)).

You have your new tool, but how does it map to the business? How will the editors get on with it? What does multi-lingual design look like? What technology do you use to build the front ends? Where to start? What is the meaning of life?

Maybe that’s content for another blog post…

Happy editing!

Sitecore forms – custom form element save issue

In a recent project we needed to add some richer functionality to a form, so decided to wrap it up in a custom Vue.js component which we could then integrate into Sitecore forms. Sounds simple right?

Building the component

Sitecore provides some good documentation on how to build different flavours of form rows – have a look at the walkthrough’s in https://doc.sitecore.com/developers/93/sitecore-experience-manager/en/sitecore-forms.html if you are interested.

Saving your data

Assuming you want to build something a bit richer than the demo video component, chances are you want to actually store data that a user provides. In our use case, we used Vue.js to update a hidden input – under the hood we then save that data into the DB and also ping off to other save actions.

Simples? Well, not quite – unless you know where to set things up.

Configuring the form row

In Sitecore forms, a custom form row needs a few things. A template in master to represent the configuration of the form row, and a set of items in core to represent the UI for configuring the form row.

https://doc.sitecore.com/developers/93/sitecore-experience-manager/en/walkthrough–creating-a-custom-form-element.html

The importance of AllowSave

This is the key bit, and took a fair amount of digging to find. I could see my custom data was being posted back to Sitecore, with the right data. But, it was never getting saved in the database 🙁

To fix I needed to make sure that both the configuration in core and my custom template had AllowSave available.

  • In core, under ‘/sitecore/client/Applications/FormsBuilder/Components/Layouts/PropertyGridForm/PageSettings/Settings’ you create your custom configuration including sub-items based off the template ‘FormSection’ (see ‘/sitecore/client/Applications/FormsBuilder/Components/Layouts/PropertyGridForm/PageSettings/Settings/SingleLineText/Advanced’ for reference’
    • Here is where you need to ensure you include ‘AllowSave‘ in the ‘ControlDefinitions‘ field for your custom item
    • This is enough to get the checkbox showing in the form builder ui, but not enough to get everything working
  • In master, under ‘/sitecore/templates/System/Forms/Fields’ you create the template to represent the configuration data being saved for your form element
    • Here is where you need to make sure the base templates contains ‘Save Settings

Summary

Setting up a custom form row / element is generally pretty simple. However, the documentation doesn’t cover quite a key step – saving the data. It doesn’t take much additional configuration as long as you know the right place to make changes!

Happy saving.

Automating a multi region deployment with Azure Devops

For a recent project we’ve invested a lot of time into Azure Devops, and in the most part found it a very useful toolset for deploying our code to both Azure and AWS.

When we started on this process, YAML pipelines weren’t available for our source code provider – this meant everything had to be setup manually 🙁

However, recently this has changed 🙂 This post will run through a few ways you can optimize your release process and automate the whole thing.

First a bit of background and then some actual code examples.

Why YAML?

Setting up your pipelines via the UI is a really good way to quickly prototype things, however what if you need to change these pipelines to mimic deployment features alongside code features. Yaml allows you to keep the pipeline definition in the same codebase as the actual features. You deploy branch XXX and that can be configured differently to branch YYY.

Another benefit, the changes are then visible in your pull requests so validating changes is a lot easier.

Async Jobs

A big optimization we gained was to release to different regions in parallel. Yaml makes this very easy by using Jobs – each job can run on an agent and hence push to multiple regions in parallel.

https://docs.microsoft.com/en-us/azure/devops/pipelines/process/phases?view=azure-devops&tabs=yaml

Yaml file templates

If you have common functionality you want to duplicate, e.g. ‘Deploy to Eu-West-1’, templates are a good way to split your functionality. They allow you to group logical functionality you want to run multiple times.

https://docs.microsoft.com/en-us/azure/devops/pipelines/process/templates?view=azure-devops

Azure Devops rest API

All of your build/releases can be triggered via the UI portal, however if you want to automate that process I’d suggest looking into the rest API. Via this you can trigger, monitor and administer builds, releases and a whole load more.

We use powershell to orchestrate the process.

https://docs.microsoft.com/en-us/rest/api/azure/devops/build/builds/queue?view=azure-devops-rest-5.1

Variables, and variable groups

I have to confess, this syntax feels slightly cumbersome, but it’s very possible to reference variables passed into a specific pipeline along with global variables from groups you setup in the Library section of the portal.

Now, some examples

The root YAML file:

The ‘DeployToRegion’ template:

And finally some powershell to fire it all off:

Happy deploying 🙂

JSS Blog post series

I’ve recently been working with the Marketing team within Valtech to get a series of JSS Blog posts published onto the Valtech site.

If anyone is interested you can access them via https://www.valtech.com/en-gb/insights/going-live-with-jss/

The topics cover things like what it’s like to move from being a traditional Sitecore dev to a JSS dev, how to get everything deployed, any gotchas we didn’t estimate for when we started and some key design decisions we made along the way.

I hope you find them useful 🙂

Setting a row colour in powershell | Format-Table

This is quite a quick post, but a useful tip. If you are setting up some data in powershell which you then fire at the console via | Format-Table it can be useful to highlight specific rows.

Imagine you have a hashtable with the key as a string, and the value as a number. When you send to the console you will see the names and values set in a table.

Now if you want to set John to be a certain colour then you can use the code below.
Note for static values this doesn’t add much value, we use it for a table that is getting printed dynamically e.g. based on a timer tick and dynamic version of the Name

This requires PowerShell 5.1 or later (check with $PSVersionTable.PSVersion) and doesn’t seem to play fair with the PowerShell ISE, however from a normal PowerShell window or VSCode it works a charm.

Happy colouring 🙂

Build yourself a JMeter load testing server

As you come close to launching your new web application, whether it be Sitecore, Node or plain ol’ HTML, it’s always good to validate how well it performs.

The cloud opens up lots of possibilities for how to approach this – including lots of online LTAAS (er, is load test as a service even a thing!?!? :))

Iteration 1 – LTAAS with Azure Devops

We are using Azure Devops within our current project, so thought it be good to give their load testing features a blast. This came with mixed success, and a mixed $$$ cost.

Pro’s

  • You don’t need to manage any of the kit
  • The sky’s the limit with the amount of concurrent machines to run (< 25)
  • It supports various methods for building a script

Con’s

  • The feedback loop can feel slow
  • You get limited support for JMeter scripts, and limited graph’s of your results. Note, this could be due to inexperience with the tool
  • It costs per minute of load test you run. We managed to un-wittingly rack up quite a substantial bill with a misconfigured script.

Iteration 2 – DIY

Another approach is that you actually setup the infrastructure yourself. For our capacity and requirements this ended up being a much more favourable option – once we’d managed to get the most out of our kit.

Pro’s

  • Assuming you use JMeter, you can quickly iterate through tests and get a wide spread of results as you go
  • If you need more grunt, you can always increase the box spec’s

Con’s

  • You need to tune the box to get the most out of it
  • Large boxes in e.g. AWS cost $$$

Configuring things yourself

Here are a few steps to follow if you really want to max out your load test box, as well as you web infrastructure:

  • Pick a box with plenty of RAM – we opted for and AWS
    r5.2xlarge – 8 core and 64GB RAM
  • Ensure JMeter can use all the RAM it can. Within JMeter.bat you can set the heap size available to the program – by default this is 512mb. If you add set HEAP=-Xms256m -Xmx60g then JMeter will sap up all 60GB of RAM it can
  • Ensure Windows can use as many TCPIP connections as possible. Again, by default this is quite low. You need to set 2 registry keys – see http://docs.testplant.com/epp/9.0.0/ePP/advovercoming_tcpip_connection_li.htm for more details.
    • Until we’d set these values, our tests would bomb out after a couple minutes as the box simply couldn’t connect to our website any more.

Other tips

JMeter has some really good plugins for modelling load, in particular around step’d load and realtime visualization of results.

I’d recommend checking out:

Some good additional reading

https://www.blazemeter.com/blog/9-easy-solutions-jmeter-load-test-%E2%80%9Cout-memory%E2%80%9D-failure

Happy testing! 🙂

Setting up JSS with Vue, Typescript and dependency injection

If JSS is a new term for you, I’d seriously recommend checking our the documentation that Sitecore have provided: https://jss.sitecore.com/ .

By the end of this post we’ll have run through how you can get JSS up and running locally, with dependencies all wired together using a DI container and any functional aspects written in TypeScript. For us this is a key set of requirements – we’ve worked with many projects that have grown over several years. By putting in some key rules and requirements up front should mean with good discipline that the codebase can scale over time.

Why JSS?

Imagine a standard Sitecore development team, typically based around C# developers and some front end devs. In the default approach to building a site you’d need everyone to contribute Razor files with the markup and associated styling and functionality. This is the approach you would probably have seen for several years until more recently with the demand for richer front end technologies. Think Vue, Angular, React and so on.

This is what JSS facilitates.

Is this right for everyone?

Just because technologies exist, it doesn’t always make them the right platform to jump on. E.g. if you have a very established Sitecore development team that doesn’t have the appetite for these front end technologies, then JSS might not be the thing for you.

Getting started

The quick start from the docs site provides 4 tasks to get you started:

Provided you have node installed, once you run ^ you should then see http://localhost:3000 fire up.

Why TypeScript?

I wouldn’t consider starting a new web project now without TypeScript as it provides so many useful features for a codebase. Refactoring is just like if you were using C#, variables have types, classes can implement other abstract classes or interfaces. If you’ve not used it before, I’d highly recommend it.

In terms of designing your application, another key factor to consider is the coupling between the different layers. Core functionality being one layer, your UI framework being another. If you structure things so that e.g. you can peel out Vue without too much trouble, moving up through different technologies or versions will be a breeze.

Changes to the default app

Here we’ll add things like some demo services, some DI registrations and a few other bits we’ll need.

1.First up lets include some extra dependencies:

2. In src/AppRoot.vue, before the export default line add import "reflect-metadata"

3. Add a tsconfig.json file to the root folder (a level above src):

4. Update the webpack config, in the Vue world this is done in vue.config.js

5. Now add a vue-shim.d.ts (in the src folder)

6. Next, some dummy TypeScript dependencies:

7. And the DI container and keys:

8. Now a TypeScript enabled Vue component: /src/components/Hello.vue

9. And to finally get it showing on a page, edit layout.vue to include your component:

After all that, you should see the homepage load up and “ServiceA” getting logged to the console. Not the most impressive output but shows the full flow of dependencies getting configured and resolved, with all the code written in TypeScript 🙂

If you are using SSR Renderings, you’ll also need to add |ts into the list of rules that get ‘unshift’ed in /server/server.vue.config.js

Deploying custom code to xConnect and the Marketing Automation Engine

Over the last few years the deployment footprint of a fully functional Sitecore application has shifted hugely. It’s no longer as simple as one database server and a couple web nodes – now you need to consider all kinds of different infrastructure.

What are the different parts of Sitecore 9?

  • xConnect – a separate web application to your main site
  • AutomationEngine – this runs as a windows service
  • IndexWorker – this also runs as a windows service
  • Website – much like the good ol’ days 🙂

Adding your own customizations

It’s pretty simple to setup your own custom facets. However what’s slightly harder is how do you deploy these to all of the different functions above? If the dll’s and configs don’t match between e.g. the website and xConnect you will get errors in the logs – luckily these do a good job of explaining the mismatch.

Sharing the love

In its simplest form the process of deploying your custom facet relies on 2 things – the dll that contains the facet and a json representation of the facets. To generate the JSON try this.

Automate the boring stuff

No one likes doing the same thing again and again, especially if you consider deploying something like this to multiple servers in the cloud. 

For a recent demo I built a process that worked both locally and remotely. This was great as the octopus deploy step only had to run one exe and the whole deployment glued together as expected.

Just show me the codez!

Just before we do I’ll quickly explain the steps involved:

  1. Build the code (no shit sherlock)
  2. Write the json schema
  3. Deploy the model config (see the sitecore post earlier about this format)
  4. Deploy the dlls
  5. Deploy the patch configs
  6. Deploy the agent configs. Note these assume you are using Slow Cheetah to transform accordingly for each environment

Before you run it you need to:

  1. Correct the references to things like xConnect etc
  2. Correct the references to the dlls you want to include and set their names in the DeployDlls method (var dllsToCopy)
  3. Set the deploymentFolder

All the source code is available online here

One file of note is sc.MarketingAutomation.ActivityTypes.xml – this allows you to patch in things like custom MA Actions, setup dependency injection within the MAEngine and a whole raft more.

Debugging Sitecore Marketing Automation UI

The previous post detailed how you can debug the server side aspects of the Marketing Automation agent. If you start experimenting with richer functionality, I’m sure you’ll soon want to create your own custom activities and UI’s.

Sitecore provide a good description of doing this in their documentation.

Adding custom fields to the UI

In my demo activity, I needed to include a MessageKey that would be passed through to the backend engine. Getting the field to show was relatively easy if you follow the example. I’d also recommend checking out this repo.

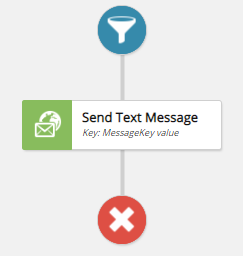
The problem I hit was getting the MessageKey value to render correctly in the UI when I opened a plan for the second time – rather than seeing the Key displayed as expected, you’d see an empty block.

Missing key value
Showing the key value

Why was this?

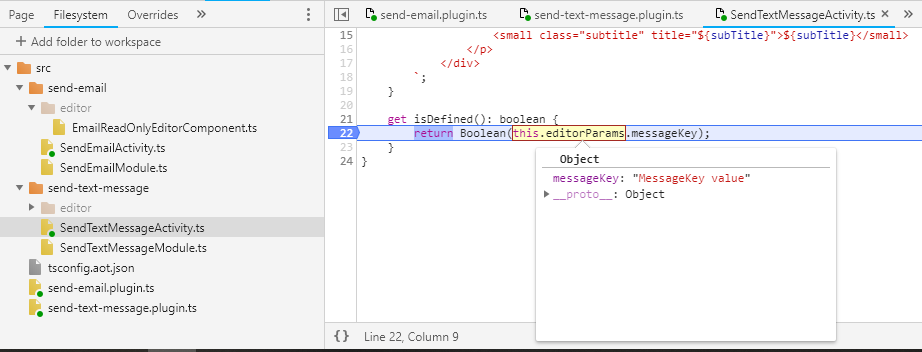
Well, it turns out the MessageKey != messageKey . For some reason, when you write your custom typescript activity, you need to reference ‘this.editorParams.messageKey’, not ‘this.editorParams.MessageKey’. Note the capital, or lack of, M.

Missing bits of Sitecore

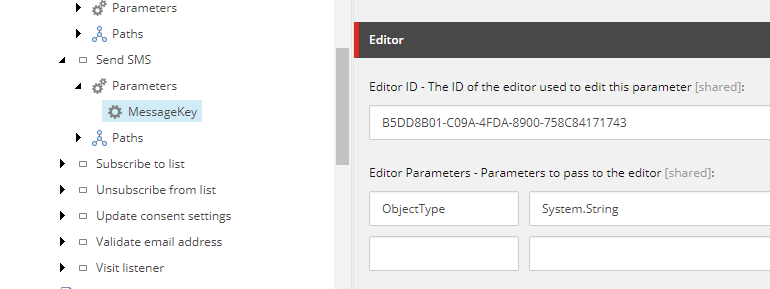
One thing the docs doesn’t mention is when you create your custom parameter within the Sitecore tree, you need to set a couple additional fields (Editor ID, Editor Parameters). Have a look at some existing ones for more details.

Debugging the UI

How did I spot the issue with the M? Once you’ve built your plugin js (npm run dev) you get a minified js file to deploy. Alongside this you will also get a sourcemap file:

If you copy this to the same folder as your deployed plugin, you can then do some clever things in chrome:

In order for this to work you need to:

  • Deploy the sourcemap file as per above
  • Add the folder where the original TS files live into chrome
    • In the diagram above => Filesystem => Add folder to workspace 

Happy debugging 🙂