Sitecore preview and unauthenticated user

We recently setup some ribbon functionality to add custom popups into buttons in the Sitecore content editor ribbon. The code to launch the popup was via a custom command:

In the popup window we wanted to be diligent and check that only certain users could see the form. This was done via:

The problem we found was sporadically the ‘SitecoreContext.User.IsAdministrator’ check would fail and the popup would be blank.

After a lot of debugging we found the cookies in the HttpRequest object would sometimes be different hence causing the differences in the users attributes. When Sitecore invokes preview mode, it sets the user to be ‘sitecore\anonymous’ via ‘PreviewManager.StoreShellUser(true);’. This is what was catching us out. If the user had been using the cms and then visited preview the popup window would inherit the anonymous user.

Once we found the solution it was a very easy change to integrate (the WebEdit command -> Run(ClientPipelineArgs args) gave us the answer).

During our command before we open the popup we simply needed to add:

Paste into Sitecore Rich Text Editor from word and remove styling

If you want to change the behavior of when you past content into the Sitecore Rich Text Editor, you can change the settings used by the Telerik control.

This is embedded into the application via:

/sitecore/shell/Controls/Rich Text Editor/EditorPage.aspx

Then the attribute that causes the change in behavior is:

<telerik:RadEditor ID=”Editor” Runat=”server”

StripFormattingOnPaste=”All,ConvertWordLists”

To see all options for the enumeration, have a look at http://demos.telerik.com/aspnet-ajax/editor/examples/cleaningwordformatting/defaultcs.aspx

Content driven classes in the sitecore rich text editor

Here’s a quick tip related to the rich text editor in Sitecore. In 6.4 the telerik rad control was added, via specific style sheets you can expose css classes for the content editor to use.

Mark Stiles has blogged about this here.

These approaches works fine but what if you want the styles to be dynamic ie a content editor can add and remove them?

The solution

  1. You setup some items in your tree which represent CSS classes (name and required styles).
  2. You then create an httpHandler which sets its content type to be CSS.
  3. In your handler you expose all the CSS styles from the tree and render to the output (you may need to explicitly select which db to use in the handler since the requests may not run through all the sitecore pipelines). If needs be you could stream through the styles from the physical existing web stylesheet as well.
  4. You then point the WebStylesheet setting at your new handler.

Remember, you need to include the CSS link tag in your layout which points to your handler otherwise the classes won’t exist in the front end.

Tables in Sitecore Page Editor

We had an interesting challenge recently which involved generating email markup via the page editor. Most html emails are build up from tables – in this situation we needed to generate several rows of content such that we were adding multiple sublayouts each representing a row:

  • Sublayout in placeholder ‘body’: <tr><td>New row content</td></tr>
  • Sublayout in placeholder ‘body’: <tr><td>Next new row content</td></tr>
  • Sublayout in placeholder ‘body’: <tr><td>etc</td></tr>

In normal usage of the Page Editor you would be adding div’s to build up your html – unfortunately emails rely on a parent or several nested parent <table> tags.

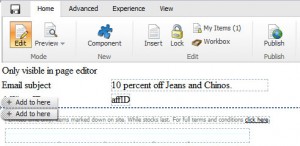
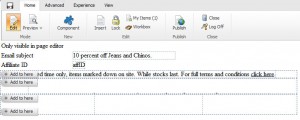
When adding new sublayouts to the page the page editor didnt recognize where the table cells and rows would live (note the position of Add to here):

If this was done via divs you would expect to see something like:

One of the strict requirements of the work was the output markup matched existing templates exactly – the original templates had been rigorously tested in email clients. Because of this we really wanted to write the markup into our layouts and sublayouts so it matched the original html (albeit broken into placeholders and components).

After testing at cell and row level we found rewriting tags when in page editor mode helped the page editor respect the page layout much better.

The solution we arrived at was to tap in at page level and rewrite the whole markup in page editor. One of the assemblies that ships with Sitecore is the HtmlAgilityPack – its great for parsing and manipulating html.

There are 2 steps required:

  1. Tap into the page render
  2. Rewrite the content

First, lets rewrite the content:

Then tie into the layout’s render:

What I like about this approach:

  • You only need to make the change once rather than per tag
  • The markup you write into the layouts and sublayouts is the original

What I don’t like about this approach:

  • Adding the style tags doesn’t check for existence – you could end up with duplicate tags if the original style attribute contains the new value. This would be easy to resolve by parsing the existing value in the AddStyle method

Hide fields on specific Sitecore Items

There are certain scenarios when working with Sitecore when you need to hide fields on specific Sitecore items in the content editor. Its worth noting the solution shown below actually hides things rather than correcting the template hierarchy. For certain scenarios this may be a quicker solution which doesn’t require editing any of the existing content of the Sitecore tree.

The two key aspects are:

  • Configuring the rules for hiding and showing fields
  • Applying the rules to the ui via the getContentEditorFields pipeline

As per normal, Sitecore makes this easy once you know which pipelines to tap into. During the lifecycle of an item in the content editor several pipelines run – the difference here is some are from Sitecore.Client rather than the kernel. In the example shown below the bulk of the code is around querying xml (config) for the rules. This could come from any datastore.

The rules I adopted were pretty simple and based around the following idea. Either you always want to show or always want to hide the field. You would then want to decide the opposite case eg when to show the field based on a set of rules – here it uses the context item as the starting point for each rule.

An example rule then becomes: Always hide the logo field unless you are below the navigation node.

Why do this – surely this points at a problem with my template hierachy? Yes it does. However the amount of regression testing involved with changing base templates of a large tree could be high. Certain assertions in code may apply rules based on templateId so changing base templates isnt a feasible option. It may be down the line you do want the logo field on certain items elsewhere in the tree as well – to bring that into play would mean simply config changes.

First you need the code:

This is then patched into the config via:

What I like about this approach:

  • Additional field rules can be added without any code changes – its all config (as long as the rules you need eg unlessIsDescendentOf exist)
  • The patch:attribute on the include file allows swapping out the existing type attribute
  • Its very easy to bolt in new IFilterRules

What I don’t like about this approach:

  • I’ve subclassed the dtos and interfaces for eg IFilterRule – the rational here was these are only ever going to needed by the FieldFilter class (and it kept the amount of code blocks in the blog post down :S)
  • More complex combinations of IFilterRules eg combining and/or logic doesn’t work yet
  • It loads the config for every field – some simple caching would get around this
  • Big or naive filter rules could really slow down the content editor

Dynamic Placeholder Keys in Sitecore

One of my colleagues at True Clarity has come up with a really neat solution to one of the challenges introduced by the Sitecore Rendering Engine. If you want to have the same container sublayout multiple times, its difficult to achieve since the placeholder’s xpath will be the same for each row.  The solution was to setup dynamic placeholder keys which allow for similar containers to be repeated in a page’s layouts.

The setup this then allows for is:

Placeholder main
– Container in main with placeholders left and right
— Widget in container left / Widget in container right
– Another container in main with placeholder small
— Widgets in container small
– Container in main with placeholders left and right
— Widget in container left / Widget in container right

Without the updated placeholder keys, you would never get the last row of widgets since the xpath for each row would evaluate to the same value (/main/left and /main/right for each row)

You can read all about it at http://trueclarity.wordpress.com/2012/06/19/dynamic-placeholder-keys-in-sitecore/

Add component in Sitecore Page Editor

In a recent 6.5 build I ran into the problem where the add component button in the sitecore page editor wasnt offering any possible placeholders in the ui. I’d setup placeholder settings so that the item names tied up to the placeholder keys in my layout.

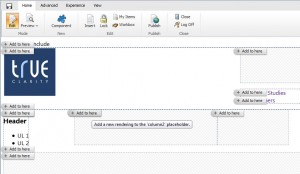
The expected behaviour would the ‘Add to here’ flyout is available as shown below:

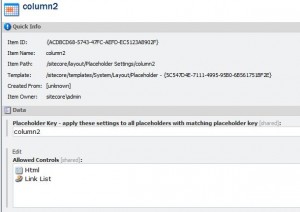
The difference in the newer versions of sitecore is that Placeholder settings template have a new field ‘Placeholder key’:

If this field is blank, the page editor doesnt know how to pair up the placeholder keys and settings. Note, historically this was done via the items name.

Navigate quickly around the Sitecore Content Editor

During the lifecycle of a Sitecore project, the content editor will be used by several types of user. Here are some tips on how to navigate quickly around the Sitecore Content Editor. As a developer, a lot of these techniques have been discovered trying to save time during the development phase of a project. That’s not to say they don’t apply for anyone!

  1. Every item in the Sitecore tree has a unique guid – this is seen in the ‘Quick Info’ bar. If you know an items guid, use this to your advantage! You can either search at the top of the content tree or alternatively the search box in the taskbar. Both options will jump you to the item if it exists.
  2. Raw values is useful for tracking down related items. If you have a multilist / treelist etc then toggling raw values will show the guid’s of all the selected items. Plug this into step 1 and you can very quickly jump to the related items. You can toggle ‘raw values’ from the ‘View’ section of the ribbon.
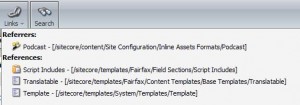
  3. The ‘Links’ flyout in the navigation panel gives you the relationship between items – here you can see all the items ‘referring to’ or ‘referred by’ the current item. A good example of this is seeing all the items which are of a certain template type.
  4. Single clicking the items path / guid / template path / template guid selects the whole value. This might seem like a minor point but saves clicks when navigating the content editor.
  5. Shortcuts – the content editor is packed with them – highlighting items in the content editor often shows the keyboard shortcut . A lot of them are listed at http://www.sitecore.net/Community/Technical-Blogs/Sitecore-Australia-Blog/Posts/2010/06/Top-100-List-of-Sitecore.aspx
  6. ‘Go to template’ available in the developer section of the ribbon. This jumps you directly to an items template.
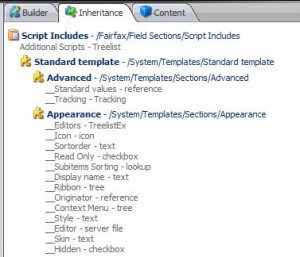
  7. The ‘inheritance’ tab of a template. Here you can see all the templates that make up the item in question – clicking any takes you to that field section / field.

Automatically set the language of the content editor

In a recent build we had a request from the client to automatically set the language of the content editor based on where in the tree they were viewing. The rules for selecting the language were quite simple:

– sitecore
— Content
— English site – field with value for default language set to be ‘en’
— French site – field with value for default language set to be ‘fr-fr’

If the user was making changes within the English site, they wanted the Content Editor to default to ‘en’. If they were editing within the French site, they wanted the Content Editor to default to ‘fr-fr’.

With the help of support, the following solution was suggested:

  1. Create your own class inherited from Sitecore.Shell.Applications.ContentManager.ContentEditorForm
  2. Add a new method:
  3. Edit \sitecore\shell\Applications\Content Manager\Default.aspx, changing the sc:CodeBeside reference to point to your new class:

    Note, you need to keep the CodeBeside reference on one line as per the out the box version (the other controls are eg DataContext, RegisterKey etc)
  4. Edit \sitecore\shell\Applications\Content Manager\Content editor.js, adding a call to your new method. This needs to happen in the onTreeNodeClick method after LoadItem.

$name in your Sitecore content

One issue that seems to regularly occur in Sitecore builds is pages showing $name in the content. Its the sort of problem that seems to creep into projects the further through you get.

Why does it happen?

When you setup Sitecore templates they are typically built up from several other templates eg:

  • A content page is comprised from:
    • Page Title field section
    • Meta Data field section
    • etc

Down the line you decide you want to add ‘Page Content – (Header and Body fields)’ to all pages so you setup a new Field Section template along with corresponding fields and __standard values. So that new pages automatically push the item name to the Header field, you set the __standard values to contain $name.

All this gets published and you then come to check the front end of the site – pages created before adding the Page Content field section now have the new header and body fields but the header field shows $name 🙁

The reason being these fields are inheriting their value from __standard values – variables such as $name are processed when items are created. See http://adeneys.wordpress.com/2009/12/29/custom-tokens-and-nvelocity-for-item-creation/ for info on how to create custom replacement tokens. There is also more information on http://learnsitecore.cmsuniverse.net/en/Developers/Articles/2010/08/Standard-values-in-sitecore.aspx

How to solve the problem?

When items are created they are processed by a set of pipelines. An example of this is expandInitialFieldValue pipeline. Out the box, this makes use of  the MasterVariablesReplacer.

You now have a couple options, either you can call the MasterVariablesReplacer for the problematic items or you could manually script the same functionality. The following code demonstrates the manual approach:

Its worth noting this can introduce some interesting challenges if Language Fallback is used on your site. The script above works fine for content items on a single language site. If you need similar functionality when language fallback is in place it may actually be meaningful to set $name = ” for non-primary languages. This will ensure the fallback will occur correctly, rather than finding $name and thinking it is valid content.