Setup custom Sitecore MediaProvider

One of Sitecore’s most useful features is the plug-ability of functionality via the configuration factory. Its very easy to add or update custom implementations where necessary.

A typical programming model used throughout this is the Provider model – Membership, Roles, Item, Proxy… the list is endless. Unfortunately one provider thats not exposed in the config factory is the MediaProvider.

No problem, thanks to some help from support they suggested a way to get around this, you can tap into the initialise pipeline. Here is the patch file to enable this:

This pipeline runs as the application intializes. Next you need the implementation of the pipeline processor:

And finally the custom implementation:

Our customization allowed us to push certain media extensions to known file types.
Take control of your sublayouts

There are several options available when setting up which data feeds into your sublayouts or renderings within Sitecore. Typically we work with sublayouts since they fit the programming style used in-house.

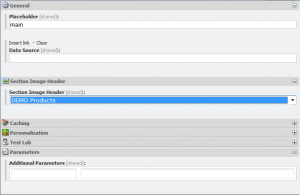
When you add a presentation component to a page you can configure data in a manner of ways:

In this example we have setup rendering parameters for ‘Section Image Header’ (the items that feed this dropdown are content items elsewhere in the content tree). Alternatively you can explicitly set the ‘Data Source’.

When coding your sublayouts, its simple to extract information from either the rendering parameters or the ‘Data Source’ field using the following examples.

To then access the ‘Section Image Header’ rendering parameter you could query:

One disadvantage with using parameters to setup the data into sublayouts is that the links database doesnt honour the relationship. See where is shared content used for help with this.

Rather than needing the code shown above in every sublayout you can create a base classes to expose the data source and parameters as properties and methods:

Another tip to consider, you can setup your sublayouts with an attribute to automatically use the rendering parameters as the sublayouts data:

In this example the sublayout will know to take its data from the item related in the ‘Section Image Header’ rendering parameter.

Add ITemplate content to a controls markup

When building web controls, a common scenario is how to cascade control parameters to the control from the markup (or code-behind). Within Sitecore controls this is typically the Field you want to render.

This approach to programming controls works very well until the set of parameters becomes very long or the control doesnt need to know about each parameter. Consider embedding a flash movie, the number of parameters to code could be huge.

In the flash example, often the parameters aren’t needed by your c# code, instead they just to be rendered to the markup.

One useful tip is that you can get information from your code behind into the template markup eg

To build the control you need to add the following attribute:

And then the template you want to use:

The content of the template can be extracted as a string with the following:

Note, based on the chosen implementation, you may not need the content of the template as a string. Instead you could simply instantiate to the control’s child controls

Where is shared content used?

A common query about the sitecore tree is how to track down related content. For link fields this is easy to check – the links flyout shows you. Another approach is to use rendering parameters to setup which content item(s) feeds sublayouts, when this is the case the links flyout doesnt display the relationship.

Using the advanced system reporter it is easy to extend the functionality to perform this check. Note, this has been built and tested against Sitecore 6.4.

  1. Create new filter and custom implementation
  2. Create new parameter for filter
  3. If the marketing centre is being used, create new scanner
  4. Setup the new report

1. Create new filter and custom implementation

Filters can be found at /sitecore/system/Modules/ASR/Configuration/Filters. The class and assembly need setting to match your applications assembly name and class name. Attributes: Value={Value}

2. Create new parameter for filter

In our code snippet above, we use the parameter Value to query the content items. Create this in /sitecore/system/Modules/ASR/Configuration/Parameters. Note – this was setup to be of type Item Selector.

3. If the marketing centre is being used, create new scanner

Scanners allow for querying the sitecore tree – if you need to check through the marketing centre, setup a new scanner in /sitecore/system/Modules/ASR/Configuration/Scanners.

  • Assembly: ASR.Reports
  • Class: ASR.Reports.Items.QueryScanner
  • Attributes: query=fast:/sitecore/system/Marketing Center/descendant-or-self::*

4. Setup the new report

The last step is to setup the report to use all the filters, scanners and parameters as above. Reports can be found in /sitecore/system/Modules/ASR/Reports.

  • Scanners: All items & scanner created in step 3
  • Viewers: Item viewer
  • Filters: New filter from step 1

kotest