As you come close to launching your new web application, whether it be Sitecore, Node or plain ol’ HTML, it’s always good to validate how well it performs.
The cloud opens up lots of possibilities for how to approach this – including lots of online LTAAS (er, is load test as a service even a thing!?!? :))
Iteration 1 – LTAAS with Azure Devops
We are using Azure Devops within our current project, so thought it be good to give their load testing features a blast. This came with mixed success, and a mixed $$$ cost.
Pro’s
You don’t need to manage any of the kit
The sky’s the limit with the amount of concurrent machines to run (< 25)
It supports various methods for building a script
Con’s
The feedback loop can feel slow
You get limited support for JMeter scripts, and limited graph’s of your results. Note, this could be due to inexperience with the tool
It costs per minute of load test you run. We managed to un-wittingly rack up quite a substantial bill with a misconfigured script.
Iteration 2 – DIY
Another approach is that you actually setup the infrastructure yourself. For our capacity and requirements this ended up being a much more favourable option – once we’d managed to get the most out of our kit.
Pro’s
Assuming you use JMeter, you can quickly iterate through tests and get a wide spread of results as you go
If you need more grunt, you can always increase the box spec’s
Con’s
You need to tune the box to get the most out of it
Large boxes in e.g. AWS cost $$$
Configuring things yourself
Here are a few steps to follow if you really want to max out your load test box, as well as you web infrastructure:
Pick a box with plenty of RAM – we opted for and AWS r5.2xlarge – 8 core and 64GB RAM
Ensure JMeter can use all the RAM it can. Within JMeter.bat you can set the heap size available to the program – by default this is 512mb. If you add set HEAP=-Xms256m -Xmx60g then JMeter will sap up all 60GB of RAM it can
If JSS is a new term for you, I’d seriously recommend checking our the documentation that Sitecore have provided: https://jss.sitecore.com/ .
By the end of this post we’ll have run through how you can get JSS up and running locally, with dependencies all wired together using a DI container and any functional aspects written in TypeScript. For us this is a key set of requirements – we’ve worked with many projects that have grown over several years. By putting in some key rules and requirements up front should mean with good discipline that the codebase can scale over time.
Why JSS?
Imagine a standard Sitecore development team, typically based around C# developers and some front end devs. In the default approach to building a site you’d need everyone to contribute Razor files with the markup and associated styling and functionality. This is the approach you would probably have seen for several years until more recently with the demand for richer front end technologies. Think Vue, Angular, React and so on.
This is what JSS facilitates.
Is this right for everyone?
Just because technologies exist, it doesn’t always make them the right platform to jump on. E.g. if you have a very established Sitecore development team that doesn’t have the appetite for these front end technologies, then JSS might not be the thing for you.
Getting started
The quick start from the docs site provides 4 tasks to get you started:
1
2
3
4
npm install-g@sitecore-jss/sitecore-jss-cli
jss create my-first-jss-app vue
cd my-first-jss-app
jss start
Provided you have node installed, once you run ^ you should then see http://localhost:3000 fire up.
Why TypeScript?
I wouldn’t consider starting a new web project now without TypeScript as it provides so many useful features for a codebase. Refactoring is just like if you were using C#, variables have types, classes can implement other abstract classes or interfaces. If you’ve not used it before, I’d highly recommend it.
In terms of designing your application, another key factor to consider is the coupling between the different layers. Core functionality being one layer, your UI framework being another. If you structure things so that e.g. you can peel out Vue without too much trouble, moving up through different technologies or versions will be a breeze.
Changes to the default app
Here we’ll add things like some demo services, some DI registrations and a few other bits we’ll need.
After all that, you should see the homepage load up and “ServiceA” getting logged to the console. Not the most impressive output but shows the full flow of dependencies getting configured and resolved, with all the code written in TypeScript 🙂
If you are using SSR Renderings, you’ll also need to add |ts into the list of rules that get ‘unshift’ed in /server/server.vue.config.js
Over the last few years the deployment footprint of a fully functional Sitecore application has shifted hugely. It’s no longer as simple as one database server and a couple web nodes – now you need to consider all kinds of different infrastructure.
What are the different parts of Sitecore 9?
xConnect – a separate web application to your main site
AutomationEngine – this runs as a windows service
IndexWorker – this also runs as a windows service
Website – much like the good ol’ days 🙂
Adding your own customizations
It’s pretty simple to setup your own custom facets. However what’s slightly harder is how do you deploy these to all of the different functions above? If the dll’s and configs don’t match between e.g. the website and xConnect you will get errors in the logs – luckily these do a good job of explaining the mismatch.
Sharing the love
In its simplest form the process of deploying your custom facet relies on 2 things – the dll that contains the facet and a json representation of the facets. To generate the JSON try this.
Automate the boring stuff
No one likes doing the same thing again and again, especially if you consider deploying something like this to multiple servers in the cloud.
For a recent demo I built a process that worked both locally and remotely. This was great as the octopus deploy step only had to run one exe and the whole deployment glued together as expected.
Just show me the codez!
Just before we do I’ll quickly explain the steps involved:
Build the code (no shit sherlock)
Write the json schema
Deploy the model config (see the sitecore post earlier about this format)
Deploy the dlls
Deploy the patch configs
Deploy the agent configs. Note these assume you are using Slow Cheetah to transform accordingly for each environment
Before you run it you need to:
Correct the references to things like xConnect etc
Correct the references to the dlls you want to include and set their names in the DeployDlls method (var dllsToCopy)
One file of note is sc.MarketingAutomation.ActivityTypes.xml – this allows you to patch in things like custom MA Actions, setup dependency injection within the MAEngine and a whole raft more.
The previous post detailed how you can debug the server side aspects of the Marketing Automation agent. If you start experimenting with richer functionality, I’m sure you’ll soon want to create your own custom activities and UI’s.
Sitecore provide a good description of doing this in their documentation.
Adding custom fields to the UI
In my demo activity, I needed to include a MessageKey that would be passed through to the backend engine. Getting the field to show was relatively easy if you follow the example. I’d also recommend checking out this repo.
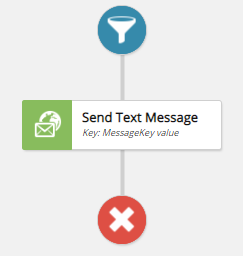
The problem I hit was getting the MessageKey value to render correctly in the UI when I opened a plan for the second time – rather than seeing the Key displayed as expected, you’d see an empty block.
Missing key valueShowing the key value
Why was this?
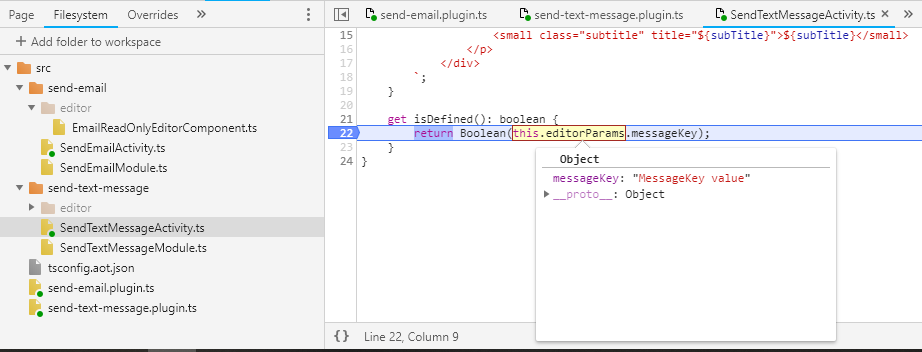
Well, it turns out the MessageKey != messageKey . For some reason, when you write your custom typescript activity, you need to reference ‘this.editorParams.messageKey’, not ‘this.editorParams.MessageKey’. Note the capital, or lack of, M.
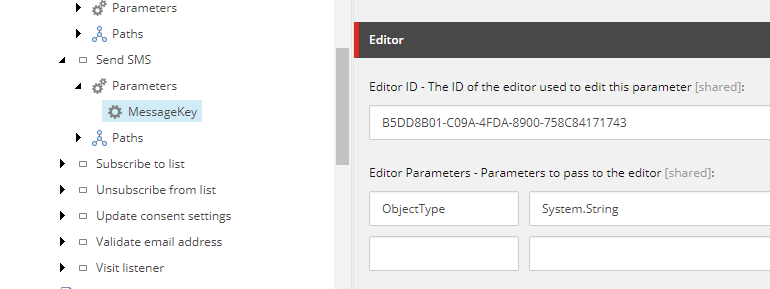
Missing bits of Sitecore
One thing the docs doesn’t mention is when you create your custom parameter within the Sitecore tree, you need to set a couple additional fields (Editor ID, Editor Parameters). Have a look at some existing ones for more details.
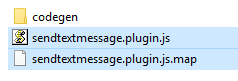
Debugging the UI
How did I spot the issue with the M? Once you’ve built your plugin js (npm run dev) you get a minified js file to deploy. Alongside this you will also get a sourcemap file:
If you copy this to the same folder as your deployed plugin, you can then do some clever things in chrome:
In order for this to work you need to:
Deploy the sourcemap file as per above
Add the folder where the original TS files live into chrome
In the diagram above => Filesystem => Add folder to workspace
There are a few ways to run the engine – by default it gets installed as a windows service however if you navigate to:
{xconnectdeployment}\App_data\jobs\continuous\AutomationEngine there is an exe (maengine.exe) you can run instead. Your code deployment will involve copying dll’s from your solution into that same folder.
To debug, run the console app and then attach to the maengine process within visual studio. When the plans run, and your activity is triggered, you should see breakpoints kick in.
If you want to make attaching to the engine simpler, in Visual Studio ‘Add existing project‘ => Select the maengine.exe on disk => Right click ‘Debug => Start new instance‘
Some developer tips
If you are getting started and can’t seem to get your code to run, try setting up a very simple plan with a loose trigger. An example trigger, where the month is October.
Also, check the custom config is in place to link your custom code with the GUID of the new activity within Sitecore. This needs to live in {xconnectdeployment}\App_data\jobs\continuous \AutomationEngine\App_Data\Config\sitecore\PatchFolder – you can call the PatchFolder what you need.
And finally, if you want to see what Sitecore is storing under the hood when you save a plan, they live in /sitecore/system/Marketing Control Panel/Automation Plans. You can always un-bucket the folder to see each plan.
As the dust settles after this years annual Sitecore Symposium, I thought it would be good to share a few highlights – in particular what 9.1 has in store.
Sitecore 9.1
The big news this year was around the imminent release of Sitecore 9.1 and all the neat new features it offers.
JSS – Javascript services – The layout service and GraphQL integration
Cortex – A machine learning integration built into the xDB & personalization layers
Universal tracker – A way of sending data into xDB from any source
Sitecore Host – The new underlying frameworks for things like Sitecore Identity
Sitecore Identity – An integration with Identity Server to provide Single Sign On througout many apps. Eventually providing the ability to remove reliance on the Membership tables
Simplified and streamlined deployment packages for XM deploys – one goal here, to really help with startup times in the cloud
1. JSS
If you managed to miss any information on JSS which sessions did you attend?!?! From the keynote to many breakout sessions, JSS and the headless revolution was one of the hot topics this year! It was announced that as of 9.1 it will no longer be in Technical Preview. All developers should now have many new API’s to call on if needed, including a GraphQL endpoint over the Sitecore DB’s. This opens up really interesting possibilities for the reach of personalized Sitecore content – you can easily consume any page or content within non-sitecore web sites, mobile apps, console apps – you name it.
One highlight, Alex Shyba took everyone through the whole workflow of designing a page in react studio => deployable connected app, all in 40 mins!
2. The Universal tracker
If you look at the way Sitecore are approaching the move to things like dotnet core, it’s very much around splicing out functional areas of the application. Some examples are things like xConnect, the publishing service & marketing automation.
The universal tracker is another example – a new scalable micro service that allows analytic data from any source to be sent into xDB. You can add multiple databases to buffer data before it gets crunched and sent to xDB. There are pipelines that run during this process so if you need to enrich any events or interactions it can be done.
From your external app/system you simply need to concoct some rest calls into the new service. ATM this only allows pushing data into xDB, there is no concept of GET’s yet.
3. Sitecore Host
Underpinning a lot of the new apps that Sitecore are developing is the Sitecore Host layer, a new dotnet core framework. The goal is to provide common features such as logging, messaging, config management, dependency injection and a raft more that can be shared throughout other consumers.
A working example of this is the new Sitecore Identity layer which allows Single Sign On built off Identity Server.
What’s really nice about this approach is your apps & features can cherry pick the required functionality they want. Then, if a specific feature doesn’t exist you can include custom plugins to build out your own implementations.
What does the future hold?
The new framework is all based around dotnet core which opens up very interesting possibilities around containerization, hosting and how you choose to run your application. Who knows, in the future we may no longer need to run your Sitecore stack on the same hosting, cloud provider or operating system!
We’ve recently finished the first phase of a redesign project for easyJet to rebuild their inspireme section of the site. An example of the new feature can be seen at https://www.easyjet.com/en/inspireme.
The aim of this post is to describe a few of the ways we’ve achieved this.
All the content for this section is being pulled from Sitecore via some custom WebApi endpoints. This allows us to pull together content and media from Sitecore and enrich with almost realtime pricing data from an import routine we run in the background.
The grid
This was one of the biggest changes. Not only from a technical and UI perspective, but also from a content perspective.
The content challenge
easyJet serve content in over 15 languages so curating content for 150+ destinations takes a lot of time.
We had a few options for where content was updated – in the end we decided to install the templates for the new fields into their production CMS so content could be uploaded. One downside, we had to sync the prod database into our test environments regularly to ensure they could check the content worked as expected.
The grid layout
Depending on the width of the viewport we needed to vary the number of tiles per row. This was because the max image size we could access was 550px. It uses a masonry grid with some customizations around the pattern of tiles we ask it to render.
This gives us the ability to generate a ‘random’ layout but within some pre-defined boundaries. Within the code there are some pre-canned row configurations that allow us to render combinations of large and small cells depending on the screen width.
The tile transitions
These are all achieved with a combination of CSS transitions and a very light smattering of jQuery. I won’t try to explain all the transitions but recommend researching things like
1
2
3
4
5
6
7
//timing via
transition:all.35sease-in-out
//and position via
transform:translateY(-50%);
//and
transform:translate3d(0,100%,0);
if you want to start dabbling.
Lazy image loading
In order to prevent your browser downloading hundreds of images when you first load the page, the site makes use of a technique mentioned here.
You can see the delay in the images loading in the timeline section on the right of the following image.
With the polyfill it even works in older internet explorer!
Cell loading
The grid cells appear to become visible in order:
This is achieved by delaying the visibility of each cell. As we push cells into the masonry plugin, they are set to be visibility:hidden;opacity:0;.
Depending on their cell index, we then offset how soon until we transition the opacity to 1. Simples 🙂
Feeding content into Angular
A lot of the UI throughout easyJet is built in Angular. There are many options for how you send Sitecore content to your UI. To avoid any lag or delay from ajax calls, we build up the content into JSON which is them embedded into the page markup – hence reducing the need for any additional requests.
Summary
If you plan to take on a rich UI project, in particular one that builds on a lot of javascript then Typescript is your friend! The way you approach your code will be much more similar to C#, plus you can actually com(trans)pile the whole thing.
Hope you like the new look and feel of inspireme. It was very interesting to work on something with such a UI focus that still needs to integrate with Sitecore.
If you’ve worked with AWS Serverless templates, you’ll appreciate how quickly you can deploy a raft of infrastructure with very little template code. The only flaw I’ve found so far is the documentation is a bit tricky to find.
Say you want to attach some custom policies to your function, you can simply embed them into your template. E.g:
In another post I mentioned the neat features now available in AWS: Serverless templates.
As part of an experiment I thought it would be interesting to see how you could put a light security layer over S3 so that media requests stream from S3 if a user logs in.
The WebApi template already ships with an S3 proxy controller. Tweaking this slightly allowed me to stream or download the image:
The issue I ran into was accessing images via the endpoint you then get in API Gateway – images were getting encoded so wouldn’t render in the browser.
The solution:
In the settings for your api gateway, add the Binary Media Type: */*
On the {proxy+} method ‘Method Response’ add a 200 response header and add a header Content-Type. Finally publish your api
The second step here may not be necessary but I found the */* didn’t kick in until I made the change.
It’s only a couple weeks now until Sugcon Europe – a definite highlight for any budding Sitecore developers. There are two days of amazing sessions lined up from a mixture of Sitecore employees and community members.
This year I’ve put together a talk all about integrating different channels with Sitecore – in this case Alexa. What better way to demonstrate the concept than to build a skill.
My particular favourite intent: play the speaker lottery.
It highlights some interesting challenges around creating chat interfaces, each of which will be covered in my talk at Sugcon. To hear the full talk swing by the Main Stage around 13:45 on Tuesday 🙂
A couple teasers:
Context is king and why does yes matter so much?
Why personalizing the content can have such positive, or negative results